Recently, we have been fighting with a weird issue that was happenning to one of our ASP.NET Core web apps hosted in Azure App Service.

The app was using ASP.NET Core Identity with cookie authentication. Customers reported to us that the application randomly signs them out.

What confused us was at first the fact that the app was being used mostly on mobile devices as PWA (Progressive Web App), and the iOS version was powered by Cordova. Since we have been fighting with several issues on Cordova, it was our main suspect – originally we thought that Cordova somehow deletes the cookies.

Cookies were all right

Of course, first we made sure that the application issues a correct cookie when you log in. We’ve been using default settings of ASP.NET Core Identity (14 days validity of the cookie and sliding expiration enabled).

We got most of the problem reports from the iOS users - that’s why we started suspecting Cordova. We googled many weird behaviors of cookies, some of them were connected with the new WKWebView component, but most of the articles and forum posts were caused by session cookies which normally get lost when you close the application. Our cookies were permanent with specified expiration of 14 days, so it wasn’t the issue.

It took us some time until we figured out that the issue is not present only in the Cordova app, but everywhere – later we tried to open the app from a browser on PC and it signed us out.

What was strange - the cookie was still there, it was before its expiration, I checked with Fiddler that it was actually sent to the server when I refreshed the page.

But the tokens…

Then I got an idea – maybe the cookie is still valid, but the token inside has expired. Close enough - it wasn’t the real cause, but it helped me find the real problem.

I tried to decode the authentication cookie to see whether there is some token expiration date or anything that could invalidate it after some time.

Thanks to this StackOverflow thread, I created a simple console app, loaded my token in it, and got the error message “The key {xxxxxxxx-xxxx-xxxx-xxxx-xxxxxxxxxxxx} was not found in the key ring.

var services = new ServiceCollection();
services.AddDataProtection();
var serviceProvider = services.BuildServiceProvider();

var cookie = WebUtility.UrlDecode("<the token from cookie>");

var dataProtectionProvider = serviceProvider.GetRequiredService<IDataProtectionProvider>();
var dataProtector = dataProtectionProvider.CreateProtector("Microsoft.AspNetCore.Authentication.Cookies.CookieAuthenticationMiddleware", "Identity.Application", "v2");

var specialUtf8Encoding = new UTF8Encoding(encoderShouldEmitUTF8Identifier: false, throwOnInvalidBytes: true);
var protectedBytes = Base64UrlTextEncoder.Decode(cookie);
var plainBytes = dataProtector.Unprotect(protectedBytes);
var plainText = specialUtf8Encoding.GetString(plainBytes);

var ticketDataFormat = new TicketDataFormat(dataProtector);
var ticket = ticketDataFormat.Unprotect(cookie);

OK, it is a good thing to get this exception – of course I didn’t have the key on my PC so I wasn’t able to decode the cookie.

So I looked in the Kudu console of my Azure App Service (just go to https://yourappservicename.scm.azurewebsites.net). This console offers many tools and there is an option to browse the filesystem of the web app.

Where are your data protection keys?

The tokens in authentication cookies are encrypted and signed using keys that are provided as part of the ASP.NET Core Data Protection API. There are a lot of options where you can store your keys.

We had the default configuration which stores the keys in the filesystem. When the app is in Azure App Service, the keys are stoted on the following path:

D:\home\ASP.NET\DataProtection-Keys

As the docs says, this folder is backed by network storage and is synchronized across all machines hosting the app. Even if the application is run in multiple instances, they all see this folder and can share the keys.

When I looked in that folder, no key with GUID from the error message was present. That’s the reason why the cookie was not accepted and the app redirected to the login page.

But why the key was not in that folder? I must have been there before, otherwise the app wouldn’t give me that cookie in the first place.

Deployment Slots

By default, the web app runs in another directory so there is no chance that the keys directory can be overwritten during the deployment.

But suddenly I saw the problem – we were using slot deployments. First, we would deploy the app in the staging slot, and after we made sure it is running, we swap the slots. And each slot has its own filesystem. When I opened Kudu for my staging app, the correct key was there.

Quick & Dirty Solution

Because we wanted to resolve the issue as fast as possible, I took the key from the staging slot and uploaded it to the production, and also copied the production key back to the staging slot. Both slots now had the same keys, so all authentication cookies issued by the app could be decoded properly.

When I refreshed the page in my browser, I was immediately signed in (the cookie was still there).

However, this is not a permanent solution – the keys expire every 90 days and are recreated, so you’d need to do the same thing again and again.

Correct Solution

The preferred solution should be storing the keys in Blob Storage and protecting them with Azure KeyVault. This service is designed for such purposes, and if you use the same storage and credentials for staging and production slot, it will work reliably.

By the way, a similar issue will probably occur in Docker containers (unless the keys are stored on some shared persistend volume). The filesystem in the container is ephemeral and any changes may be lost when the container is restarted or recreated.

So, if you are using deployment slots, make sure that both have access to the same data protection keys.

Recently, I have run into an interesting issue with one of my websites – it runs in Azure App Service and I was using automated deployments from VSTS Azure DevOps.

After the website was deployed, it didn’t start – I was getting HTTP 502.


Diagnostics

When I deploy something into Azure App Service and the app doesn’t start, I go to the Kudu console first (https://nameofyoursite.scm.azurewebsites.net) and look in LogFiles/eventlog.xml.

If there is a problem with app startup (configuration error, missing DLLs or an exception thrown during the initialization of the application), there is a chance the error will be in this file.

If you are using Application Insights and the exception occurs on startup, it will probably not be recorded because the Application Insights DLLs may not be loaded and initialized.

You can also turn on filesystem logging in Azure portal to find more details.


Cannot create directory? What?

A quick look in eventlog.xml using Kudu console told me that I am getting FileNotFoundException (Could not find file 'D:\home\site\wwwroot\Temp'.) from Directory.CreateDirectory.

It was quite strange – the path was correct and the function should actually create that directory instead of complaining that the path doesn’t exist.

In general, it is not the best idea for a web app to write in the filesystem, but most web apps does this, at least they write some log files, store uplaoded files temporarily before they are processed and so on.


After a few minutes, I discovered another weird thing – when I was browsing the wwwroot folder in Kudu, the Temp folder was not there, and when I tried to create it using Kudu, I got the following error:

409 Conflict: Cannot delete directory. It is either not empty or access is not allowed.

What? I was creating a directory, not deleting anything.


I tried to use mkdir Temp in the command line, but got the following:

The system cannot find the file specified.


Desperate enough, I tried to connect using FTP and the folder was there! I tried to delete it, but I got the same results from the app and from the Kudu.

Then I noticed that FTP shows me old versions of some files. So the app must have been running from a different folder. I double checked the FTP and Kudu addresses, but they were the same.


What was even more strange – the previous version of the web app did the same writes in the filesystem and it worked. The startup code didn’t change at all and the app worked normally before the deployment.

What has changed? What have I done?


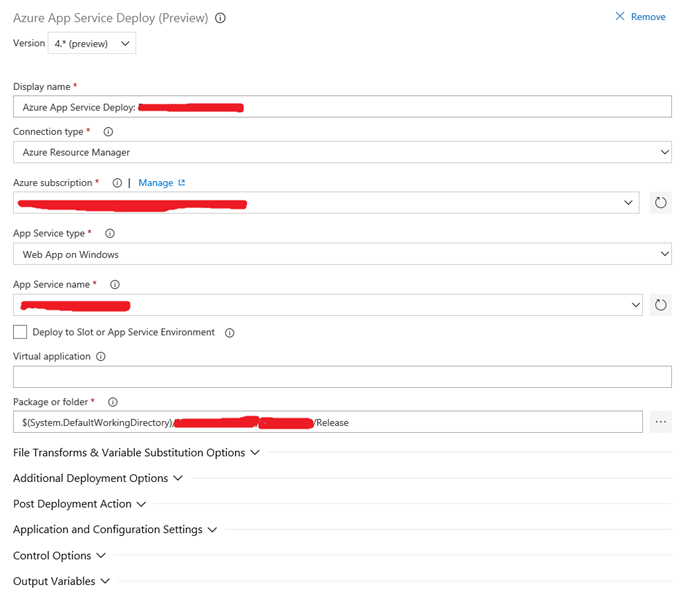
Azure App Service Deploy Task

The only difference was the deployment process. The previous version of the website was deployed few months ago directly from Visual Studio.

This time, I tried to deploy using Azure DevOps which has a very nice deployment task for that.  It worked for the test site so I just create a different environment for production and deployed there.

I have looked at the definition of the deployment task, but haven’t found anything unusual – it was quite straight-forward – take the build artifacts and push them in the Azure App Service.

image


What now? Because it was a production site with some traffic, I decided to just deploy from Visual Studio to fix the error quickly, and then dive into the cause of the issue. So I hit Publish and couldn’t believe the error message:

Invalid access to memory location.

I started googling and finally found the answer.


Run from Package

The 4.* version of the Azure App Service Deploy task is using Run from Package application mode by default, which means that it uploads a ZIP file with the app (they call it Zip Deploy) and sets WEBSITE_RUN_FROM_ZIP application setting to 1.

The application then runs from the ZIP package - there is a virtual file system which makes the application and Kudu console see the contents of the ZIP package in the wwwroot folder.

The virtual file system it is not used when you connect using FTP, so that’s why I was seing different files in the folder.

And because the application runs from the ZIP package, it cannot write to its filesystem. Sadly, the error messages produced by I/O functions are not helpful.

Since most web apps I have seen write in their filesystem, this is quite significant change of behavior, and making it a default option in Azure DevOps deployment task can lead to a lot of confusion.

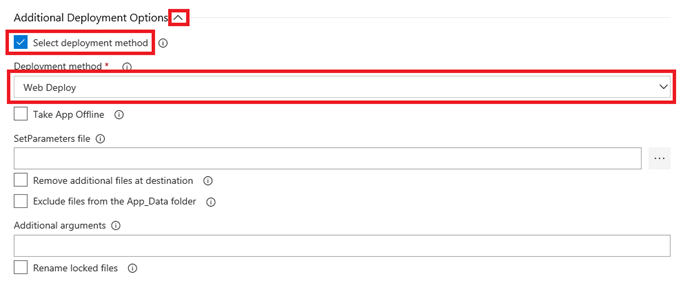
I didn’t know about this feature at all, and what is more, the setting is hidden in VSTS task so I didn’t notice it. You need to expand the Additional Deployment Options section and click on the Select deployment method checkbox, which is unchecked by default. Only after these two clicks, you can see the dropdown with deployment methods – ZipDeploy is the default one.

I needed to change it to use WebDeploy so the application files will be stored as normal files and the application can write in the filesystem like it could before.

image


And don’t forget to remove the WEBSITE_RUN_FROM_ZIP application setting, otherwise the deployment will fail with Invalid access to memory location error.

Recently, I have been working on OpenEvents – an open source event registration system. 

Because I am going to have several talks about microservices architecture in upcoming months, I have chosen different approach to build this app so it can work as a demo.

I have separated the event management part and the registration part in two services and used Azure Service Bus to do messaging between these two parts.


Which package?

There are two Nuget packages which you can use:


Both packages contain the queue or topic client classes and all API you need to send, receive and work with the messages.

The old package also contained the NamespaceManager class which could be used to manage topics, subscriptions and queues inside the Service Bus namespace.

It was very useful because the application could provision these resources at startup and didn’t require to prepare all the queues and topics manually. Especially if you had multiple environments (dev, test, staging, production), it is easier to let the app create what is needs than to maintain four environments.


Resource Manager

The new package doesn’t include any API to manage these resources. The only way to create topics, subscriptions and queues programmatically is to use Azure Resource Manager.

Azure Resource Manager exposes a REST API and there is a Nuget package with API client for almost every Azure service. The package name always starts with Microsoft.Azure.Management, so we need to use Microsoft.Azure.Management.ServiceBus.

Because consuming the raw REST API is not so convenient, some Azure services also offer a package with Fluent suffix. These packages contain wrappers which make using the API more convenient.

In my app, I have used Microsoft.Azure.Management.ServiceBus.Fluent Nuget package.


First, I need to authenticate and create the ServiceBusManager object so we can work with the resources inside the Service Bus namespace.

var credentials = SdkContext.AzureCredentialsFactory.FromServicePrincipal(CLIENT_ID, CLIENT_SECRET, TENANT_ID, AzureEnvironment.AzureGlobalCloud);
var serviceBusManager = ServiceBusManager.Authenticate(credentials, SUBSCRIPTION_ID);
serviceBusNamespace = serviceBusManager.Namespaces.GetByResourceGroup(RESOURCE_GROUP, RESOURCE_NAME);


Creating the topic is then quite easy:

public async Task<ITopic> EnsureTopicExists(string topicName)
{
    var topics = await serviceBusNamespace.Topics.ListAsync();
    var topic = topics.FirstOrDefault(t => t.Name == topicName);

    if (topic == null)
    {
        topic = await serviceBusNamespace.Topics.Define(topicName)
            .WithSizeInMB(1)
            ...      // other configuration
            .CreateAsync();
    }

    return topic;
}


You can use the same approach for queues, subscriptions and other resources.


Authentication

The last thing you need to handle is the authentication for the Resource Manager API. To do that, I have created a service principal and given it a permissions to manage the Service Bus namespace.

1. Install the Azure PowerShell.


2. Login to the Azure account:

Login-AzureRmAccount


3. If you have multiple subscriptions registered in your account, select the correct one. I am using the name of the subscription to identify it:

Select-AzureRmSubscription -SubscriptionName "SUBSCRIPTION_NAME"
Get-AzureRmSubscription -SubscriptionName "SUBSCRIPTION_NAME"


4. Note the TenantId and Id of the subscription from the output of the previous step – you will need it later.


5. Now, create the service principal. Make sure the password is strong enough and the name describes what is the purpose of the principal. The password of the principal will be the ClientSecret – do not lose it as you will need it later.

$p = ConvertTo-SecureString -asplaintext -string "PRINCIPAL_PASSWORD" -force
$sp = New-AzureRmADServicePrincipal -DisplayName "PRINCIPAL_NAME" -Password $p


6. Retrieve the ApplicationId of the principal. It is often called ClientId – you will need it later.

$sp.ApplicationId


7. Assign the Contributor role to the service principal for the Service Bus resource. Use the name of the resource group and exact name of the Service Bus.

New-AzureRmRoleAssignment -ServicePrincipalName $sp.ApplicationId -ResourceGroupName RESOURCE_GROUP -ResourceName RESOURCE_NAME -RoleDefinitionName Contributor -ResourceType Microsoft.ServiceBus/namespaces


No we should have all the information we need to make our code work.


Configuration

Keeping these information in the code is not a good idea. I am using the Microsoft.Extensions.Configuration to store the Service Bus configuration and secrets. I have created a class that represents my configuration:

public class ServiceBusConfiguration
{

    public string ConnectionString { get; set; }


    public string ResourceGroup { get; set; }

    public string NamespaceName { get; set; }


    public string ClientId { get; set; }

    public string ClientSecret { get; set; }

    public string SubscriptionId { get; set; }

    public string TenantId { get; set; }
}


I have added the following section in the appconfig.json file in my application:

{
  ...
  "serviceBus": {
    "resourceGroup": "RESOURCE_GROUP",
    "namespaceName": "RESOURCE_NAME",
    "connectionString": "",
    "clientId": "",
    "clientSecret": "",
    "subscriptionId": "",
    "tenantId": ""
  },
  ... 
}


To get the configuration object for Service Bus, I can use the following code:

var config = Configuration.GetSection("serviceBus").Get<ServiceBusConfiguration>();


Working with User Secrets

Since I don’t want to keep the secrets in the source control, I am using User Secrets.

I have added the following section at the top of my .csproj file…

<PropertyGroup>
  <UserSecretsId>openevents</UserSecretsId>
</PropertyGroup>


…and the following section at the bottom:

<ItemGroup>
  <DotNetCliToolReference Include="Microsoft.Extensions.SecretManager.Tools" Version="2.0.0" />
</ItemGroup>


Now I can use command line to store the secret configuration values outside of my project folder.

dotnet user-secrets set serviceBus:connectionString "SERVICE_BUS_CONNECTION_STRING"
dotnet user-secrets set serviceBus:subscriptionId SUBSCRIPTION_ID
dotnet user-secrets set serviceBus:tenantId TENANT_ID
dotnet user-secrets set serviceBus:clientId CLIENT_ID
dotnet user-secrets set serviceBus:clientSecret CLIENT_SECRET


Remember that CLIENT_ID is the ApplicationId value you have printed out in step 6. The CLIENT_SECRET is the password of the service principal.


The last thing you need to do is to add user secrets in the configuration builder so the secrets will override the values from the appsettings.json file.

var builder = new ConfigurationBuilder()
    .SetBasePath(hostingEnvironment.ContentRootPath)
    .AddJsonFile("appsettings.json")
    .AddJsonFile($"appsettings.{hostingEnvironment.EnvironmentName}.json", optional: true)
    .AddEnvironmentVariables();

if (hostingEnvironment.IsDevelopment())
{
    builder.AddUserSecrets<Startup>();
}

Configuration = builder.Build();


By default, they are stored in the following location: c:\Users\USER_NAME\AppData\Roaming\Microsoft\UserSecrets

Remember that user secrets are designed for development purposes, they should not be used in production environment.

We have started using Microsoft Teams in my company. Despite the fact the product is not mature in some areas yet, I like it more than Slack we used before, mostly because the Office integrations - files, OneNote sheets in tabs in each channel are just a great idea. But that’s another story.

Recently I was on some hackathong and got an idea. Every day at 11 AM, we have the same discussion at work - it goes something like this:

“Hey guys, what about having a lunch?”

“OK, but who else is coming?”

“I don’t know, AB is not here yet, CD won’t come today…”

“OK, so ask AB if he is on the way.”

“And which restaurant we will go?”

“I don’t know, what do they have today at EF’s?”

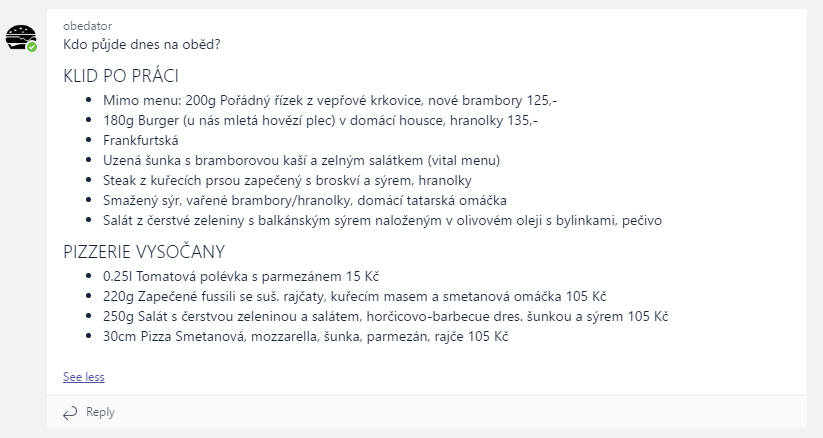
So I have decided to build a chat bot which posts a message every day at 11 AM to a specific channel on Teams. It will grab the menu of several restaurants nearby and post it in the channel (sorry, the image is in Czech: it is a lunch menu of two restaurants near our office):
Lunch bot


And because I haven’t time to play with Azure Functions yet, I have decided to build the bot using the functions. Well, that wasn’t the only reason acutally. Since the bot doesn’t need to run all the time and basically, it is a function that needs to be executed every day at a specific time, Azure Functions is the right technology for this task. And it should be very cheap because I can use the consumption-based plan.


Bot Builder SDK and Azure Functions

Unfortunately, there is not many samples of using Bot Builder SDK with Azure Functions.

I have installed Visual Studio 2017 Preview and the Azure Function Tools for Visual Studio 2017 extension, so I can create a classic C# project and publish it as Azure Functions application.


To build a bot, you need to register your bot and generate the application ID and password. You can enable connectors for various chat providers, I have added the Microsoft Teams channel.

On the Settings page, do not specify the Messaging endpoint yet. Just generate your App ID and password.


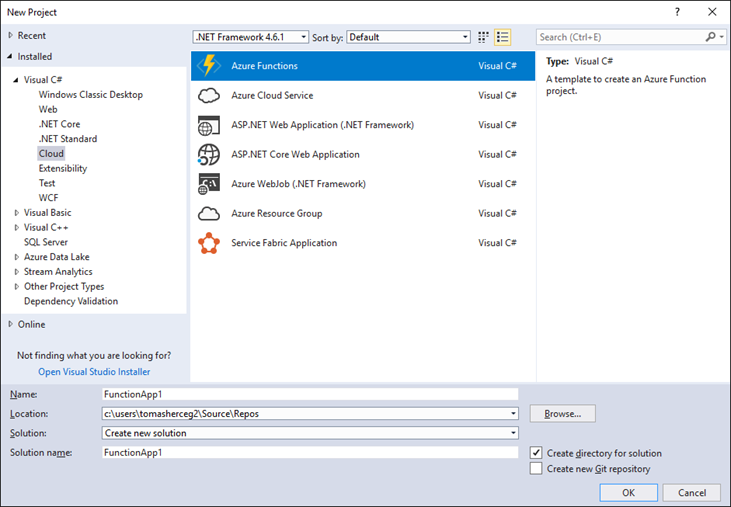
Then, create an Azure Functions project in the Visual Studio.
image


You will need to install several NuGet packages:

  • Microsoft.Bot.Builder.Azure
  • Microsoft.Bot.Connector.Teams


Every Azure Function is a class with a static method called Run. First, we need to create a function which will accept messsages from the Bot Framework endpoints. 

[FunctionName("message")]
public static async Task<object> Run([HttpTrigger] HttpRequestMessage req, TraceWriter log)
{
    // Initialize the azure bot
    using (BotService.Initialize())
    {
        // Deserialize the incoming activity
        string jsonContent = await req.Content.ReadAsStringAsync();
        var activity = JsonConvert.DeserializeObject<Activity>(jsonContent);
        
        // authenticate incoming request and add activity.ServiceUrl to MicrosoftAppCredentials.TrustedHostNames
        // if request is authenticated
        if (!await BotService.Authenticator.TryAuthenticateAsync(req, new[] { activity }, CancellationToken.None))
        {
            return BotAuthenticator.GenerateUnauthorizedResponse(req);
        }
        
        if (activity != null)
        {
            // one of these will have an interface and process it
            switch (activity.GetActivityType())
            {
                case ActivityTypes.Message:
                    await Conversation.SendAsync(activity, () => new SystemCommandDialog()
                    {
                        Log = log
                    });
                    break;
                case ActivityTypes.ConversationUpdate:
                case ActivityTypes.ContactRelationUpdate:
                case ActivityTypes.Typing:
                case ActivityTypes.DeleteUserData:
                case ActivityTypes.Ping:
                default:
                    log.Error($"Unknown activity type ignored: {activity.GetActivityType()}");
                    break;
            }
        }
        return req.CreateResponse(HttpStatusCode.Accepted);
    }
}

The HttpTrigger attribute tells Azure Function to bind the method to a HTTP request sent to URL /api/messages. Bot Framework will send HTTP POST request to this method when someone writes a message to a bot or mentions it, when the conversation is updated and so on - you can see the types of activities in the switch block.

To be able to test the bot locally, you need to add the application ID and password in the local.settings.json file. You can read the values using Environment.GetEnvironmentVariable("MicrosoftAppId"):

    "MicrosoftAppId": "APP_ID_HERE",
    "MicrosoftAppPassword": "PASSWORD_HERE"

The SystemCommandDialog is a class which will handle the entire conversation with bot. I have created several configuration commands, so I can use /register and /unregister commands to enable the bot in a specific Teams channel. You can look at the examples to understand how the communication looks like.


Creating Teams Conversation

I have another function in my project which downloads the lunch menus and posts a message every day at 11 AM.

[FunctionName("AskEveryDay")]
public static async Task Run([TimerTrigger("0 0 11 * * 1-5")]TimerInfo myTimer, TraceWriter log)
{
    try
    {
        string message = ComposeDailyMessage(...);
        await SendMessageToChannel(message, log);
        log.Info($"Message sent!");
    }
    catch (Exception ex)
    {
        log.Error($"Error! {ex}", ex);
    }
}

private static async Task SendMessageToChannel(StringBuilder message, TraceWriter log)
{
    var channelData = new TeamsChannelData
    {
        Channel = new ChannelInfo(CHANNEL_ID_HERE),
        Team = new TeamInfo(TEAM_ID_HERE),
        Tenant = new TenantInfo(TENANT_ID_HERE)
    };

    var newMessage = Activity.CreateMessageActivity();
    newMessage.Type = ActivityTypes.Message;
    newMessage.Text = message.ToString();
    var conversationParams = new ConversationParameters(
        isGroup: true,
        bot: null,
        members: null,
        activity: (Activity)newMessage,
        channelData: channelData);

	// create connection
    var connector = new ConnectorClient(new Uri(subscription.ServiceUrl), 
	    Environment.GetEnvironmentVariable("MicrosoftAppId"), Environment.GetEnvironmentVariable("MicrosoftAppPassword"));
    MicrosoftAppCredentials.TrustServiceUrl(subscription.ServiceUrl, DateTime.MaxValue);
	
	// create a new conversation
    var result = await connector.Conversations.CreateConversationAsync(conversationParams);
    log.Info($"Activity {result.ActivityId} ({result.Id}) started.");
}

The function is called every work day at 11AM thanks to the TimerTrigger.

The conversation in Teams is created by the CreateConversationAsync method which needs the TeamsChannelData object. To specify the channel which should contain the message, you need channel ID, team ID and tenant ID.

There are several ways how to get these values - for example, you can create a special command to display these values. When you mention the bot in the Teams channel, you will be able to get these IDs and display them or write them to some log file.

public virtual async Task MessageReceivedAsync(IDialogContext context, IAwaitable<IMessageActivity> argument)
{
    var message = await argument;
    
    var channelId = message.ChannelData.channel.id;
    var teamId = message.ChannelData.team.id;
    var tenantId = message.ChannelData.tenant.id;
    
    await context.PostAsync($"Channel ID: {channelId}\r\n\r\nTeam ID: {teamId}\r\n\r\nTenant ID: {tenantId}");
    context.Wait(MessageReceivedAsync);
}


Publishing the App

You can right-click the project in the Visual Studio and choose Publish. The wizard will let you create a new Azure Functions application in your subscription.


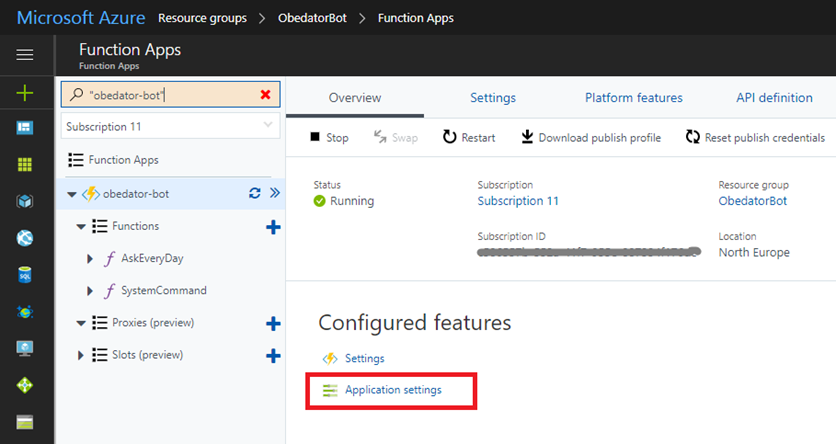
After the application is published, you need to navigate to the Azure portal. First, add the Application Settings for MicrosoftAppId and MicrosoftAppPassword.
image


Then obtain the function URL and place it in the Messaging endpoint field in the Bot App you have registered at the beginning - it’s on the Settings page.

image


Sideloading the Bot App in Teams

To be able to use the bot in the Microsoft Teams, you need to create a manifest and sideload it into your team. You need to do it only once.

You need to create a manifest, add bot icons and create a ZIP archive which you will upload in the Teams app. The manifest can look like this:

{
    "$schema": "https://statics.teams.microsoft.com/sdk/v1.0/manifest/MicrosoftTeams.schema.json", 
    "manifestVersion": "1.0",
    "version": "1.0.0",
    "id": "MICROSOFT_APP_ID",
    "packageName": "UNIQUE_PACKAGE_NAME",
    "developer": {
        "name": "SOMETHING",
        "websiteUrl": "SOMETHING",
        "privacyUrl": "SOMETHING",
        "termsOfUseUrl": "SOMETHING"
    },
    "name": {
        "short": "BOT_NAME"
    },
    "description": {
        "short": "BOT_DESCRIPTION",
        "full": "BOT_DESCRIPTION"
    },
    "icons": {
        "outline": "icon20x20.png",
        "color": "icon96x96.png"
    },
    "accentColor": "#60A18E",
    "bots": [
        {
            "botId": "MICROSOFT_APP_ID",
            "scopes": [
                "team"
            ]
        }
    ],
    "permissions": [
        "identity",
        "messageTeamMembers"
    ]
}

And that’s it.


Debugging

There are some challenges I have run into.

You can run your functions app locally and use the Bot Emulator application for debugging. You can test general functionality, but you won’t be able to test features specific to Teams (the channel ID and stuff like this).

You can debug Azure Functions in production. You can find your Functions app in the Server Explorer window in Visual Studio and click Attach Debugger. It is not very fast, but it allows you to make sure everything works in production.

And finally, there is the Azure portal with streaming log service which is espacially useful.

The only thing to be careful about is that the Functions app doesn’t restart sometimes after you publish a new version of it. I needed to stop and start the app in the Azure portal to be 100% sure that the app is restarted.