Few weeks ago, I got an idea to implement an interesting feature in DotVVM – the Server-side viewmodel caching. It can have a huge impact on a performance of DotVVM applications as it can reduce the data transferred on postback to almost nothing.

Intro – the basic principles of DotVVM

The idea behind DotVVM was quite simple – we want to use MVVM for building web applications, and we want to write in C#.

That’s why the viewmodel in DotVVM is a C# class and lives on the server where .NET runtime is. In order to have client-side interactivity in the web page, the viewmodel needs to operate on the client-side. Therefore, DotVVM serializes the viewmodel into JSON and includes it with the page HTML.

When the page is loaded, the client-side library of DotVVM will parse the JSON and create a Knockout JS instance of the viewmodel. Thanks to this, the DotVVM controls can use the Knockout data-bind attributes to offer their functionality. DotVVM just translates <dot:TextBox> to <input data-bind=”…” /> to make it working.

When the user decides to click a button, there is a method that needs to be called. However, this method lies on the server. DotVVM has to take the Knockout JS viewodel, serialize it and send it to the server, where it is deserialized so the method has the all the data and state that it needs to run. After the method completes, the viewmodel is serialized again and sent to the client where it is applied to the Knockout JS instance of the viewmodel and all controls in the page are updated.

An entire viewmodel is sent to the server

Changes made on the server are sent to the client

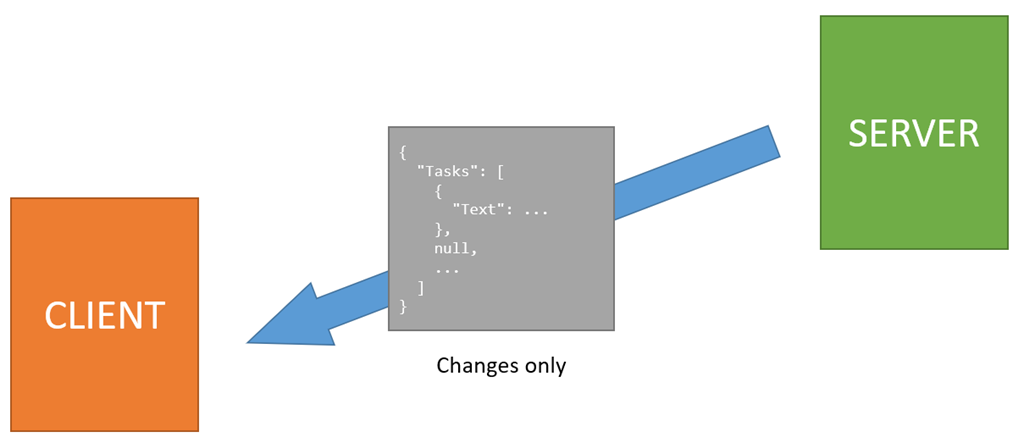
The entire process involves transferring the viewmodel from the server to the client and back. The response to the postback is efficient in general as it doesn’t need to transfer the entire viewmodel. The server compares the current viewmodel with the version received from the client, and sends only the changes.

But because of the stateless nature of DotVVM, the client has to send the entire viewmodel to the server. Or had, to be precise, because this now changes with the Server-side viewmodel caching.

DotVVM offers several mechanisms to prevent the entire viewmodel to be transferred:

  • The Bind attribute can specify the direction in which the data will be transferred.
  • The Static Commands allow to call a method, pass it any arguments and update the viewmodel with the result returned from the call.
  • REST API bindings can load additional data from a REST API which are not considered as a part of the viewmodel and therefore are not transferred on postbacks.

However, each method has some limitations and is more difficult to use. The comfort of using Command Binding which triggers a full postback is very tempting.

What about storing the viewmodel on the server?

The reason for sending the entire viewmodel on the server is simple – the viewmodel is not stored anywhere. When the server completes the HTTP request and sends the viewmodel to the client, it forgets about it immediately.

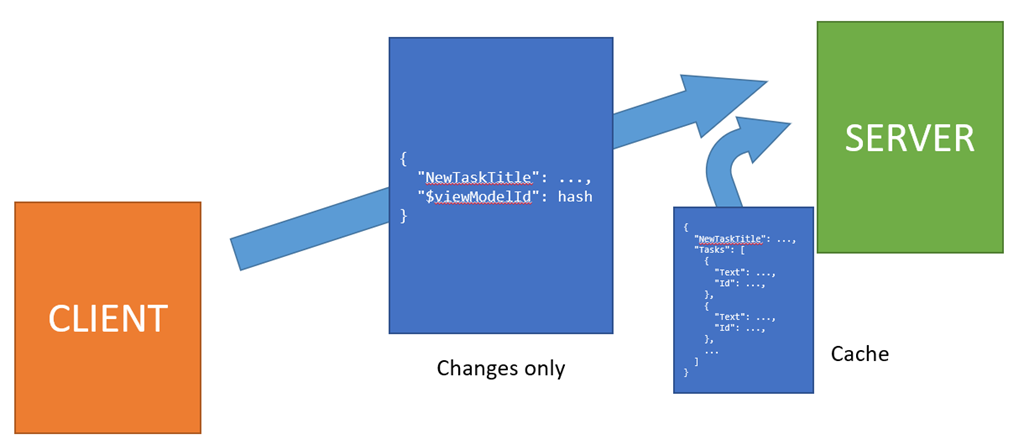
The server-side caching feature will change this behavior – the viewmodel will be kept on the server (in a JSON-serialized form, so the live object with dependencies to various application services could be garbage-collected) and the client will send only the diff on postback.

Only the changes are sent to the server, the rest is retrieved from viewmodel cache

Storing the viewmodel on the server introduces several challenges:

  • It will require more server resources. The viewmodels are not large in general (the average size is 1-15 kB based on the complexness of the page) and they can be compressed thanks to their text-based nature.
  • It can make DOS attacks easier it an attacker finds a way to exhaust server resources.
  • When the application is hosted on a web farm, the cache must be distributed.
  • What about cache synchronization in case of multiple postbacks?
  • Is the cache worth the troubles at all?

During our use of DotVVM on customer projects, we have made several observations:

  • When DotVVM is used on a public-facing websites, the viewmodels are tiny and mostly static. It is very frequent that all HTTP GET requests have the same viewmodel and it changes only then the user interacts with the page (e.g. enters a value in a textbox).
  • When DotVVM is used in line of business applications with many GridView controls, the most of the viewmodel is occupied by the contents of the GridView. If the user doesn’t use the inline edit functionality, the GridView is read-only and there is not much value in transferring its contents back to the server – the server can retrieve the most current data from the database.

It is obvious that the server-side caching will not help much in the first case, however it will help a lot in the second case.

Imagine a page with a GridView control with many rows. Each row will contain a button that can delete the particular row.

The viewmodel will contain a collection of objects representing each row. The data are read-only and thus cannot change. When the delete button is clicked, the viewmodel doesn’t need to be transferred to the server at all – we have saved almost 100%.

There is still some metadata that need to be transferred, like the cached viewmodel ID, CSRF token, and also the encrypted and protected values are excluded from the caching mechanism. But this data are relatively small in comparison to the GridView data.

Even if the user decides to use the inline editing functionality and updates a particular row, only the changes made in the viewmodel will be transferred. If there was 50 rows and one was changed, we can save about 98% of the data.

The viewmodels have 1 to 15kBs in average, so it’s not such a big deal, but still, when you multiply it by the number of concurrent users, or consider the users using a cellular networks, the difference can be quite significant.

Deduplication of cache entries

The observation for public-facing websites mentioned in the previous section brings another challenge – imagine there are thousands of users visiting the website. Most of them will leave immediately without making any postback, or they will just browse a few pages without any other of interaction that would trigger the postback.

As was mentioned before, the viewmodels in this case can be static. They will contain a few values that are used by the page, but their values will be the same when the page is loaded.

Imagine a page with a contact form. The viewmodel will contain properties for the subject, message contents and reply e-mail address, but they will be empty unless the user change them.

That’s why we’ve decided to use a hash of the viewmodel as the cache key. These pages will not exhaust the cache with thousands of equal entries because they will get the same key. This will allow to have just one cache entry for each page that will be shared between all its users (unless they change something and make a postback).

The encrypted and protected values are excluded from the caching mechanism, so it should not bring any security issue. When the user changes the viewmodel, it will get a different hash and will be stored in a separate cache entry.

Can the cache entry expire?

Of course it can. Most of us have probably had issues with expired sessions. But thankfully, this will not be the case of DotVVM. We always have the most current viewmodel on the client, so when the postback is sent and the server cannot find the viewmodel in cache, it will respond that there is a cache miss. In this case, DotVVM will automatically make an additional (full) postback sending the entire viewmodel to the server. Unless the authentication cookie is still valid, the postback will be performed – it will be just a little slower than usual.

The problem is now reduced in fine-tuning the cache settings – choosing a good compromise between the lifetime of the cached viewmodels and the cache size (and a proper storage – it may not be efficient to store the data in-memory).

It will take a lot of measurements and probably creating some tools which can help with making informed decisions on how to set up the cache correctly.

Can I try it now?

Not yet, but very soon. I have just added a new API for turning on experimental features. But in the next preview release of DotVVM, there will be an option to turn this feature on globally, or only for a specific pages.

Recently, I have written a series of articles on modernizing ASP.NET Web Forms apps. Now this topic became even more important thanks to the recent announcement of .NET 5. It was made clear that ASP.NET Web Forms will not be ported to .NET Core.

TLDR: DotVVM can run side by side with ASP.NET Web Forms, and it also supports .NET core. You can install it in your Web Forms project and start rewriting individual pages from Web Forms to DotVVM (similar syntax and controls with MVVM approach) while still being able to add new features or deploy the app to the server. After all the Web Forms code is gone, you can just switch the project to .NET Core. See the sample repo.

To rewrite or continuously upgrade

There are still plenty of ASP.NET Web Forms applications out in the world and their authors now stand by a difficult decision:

  • Throwing the old application away and rewrite it from scratch using modern stack
  • Trying to continously modernize the app and rewrite all the pages on-the-fly

The first option – total rewrite – is very time consuming. If the original application was developed for more 10 years, which is not uncommon, I can hardly imagine that it can be rewritten it in less than half of that time. In addition, when the application needs to support company daily tasks and workflows while responding to rapidly changing business needs, it is impossible to stop adding new features for months or even years because of the rewrite.

Of course, the company can build a new team that will develop the new version while keeping the old team maintaining and extending the old app, but it means double effort and a vast amount of time required to transfer the domain knowledge from the old team to the new one. Also, many things will need to be done twice, and it will probably take years until the new version is ready for production.

And finally, the management never likes to hear about rewriting the software from scratch. I have seen many situations where the project leads had to fight very hard in order to justify such decision.

The second option – the continuos modernization – looks a little bit easier. Imagine you have a Web Forms application with hundreds of ASPX pages. If you can rewrite one page per day using other technology and integrate the new pages with the old ones so the user won’t notice they are made with different stacks, after several months you can get rid of all of the ASPX pages and stay with a more modern solution. It may not be perfect as there will still be some legacy code, but it is much better than nothing, and if you are lucky and don’t use WCF or Workflow Foundation which are also not supported on .NET Core, you will be able to move the project to .NET Core.

Two projects? Possible, but maybe more difficult than it has to be.

But how to do it? Let’s suppose we have an old app that needs to be maintained.

Shall we create a new ASP.NET Core project that would run side by side, maybe on the same domain, and make links from the old to new pages and vice versa?

It can work if the same CSS styles are used. The user should not be able to tell that he actually uses two web apps.

However, there may be some issues with sign-on as the new app can use different authentication cookies than the old one – the authentication will need to be integrated somehow. Also, if session is used (which is not a good idea in general, but it is also quite frequent), it will not be shared between the two applications.

Moreover, this will require some configuration changes on the server, and the deployment model will need to be changed as you will now deploy two applications instead of one.

If the application caches some data in memory, you may also run into various concurrency issues as the caches will need to be invalidated. There will also be some duplication if the business layer is not properly separated from the UI.

What is more, if you decide to use Angular, React or other JavaScript framework, there is also a large amount of knowledge required to start working with these technologies. The business logic and data will have to be exposed through a REST API (or Graph QL), which may be an additional effort to set up at the beginning.

DotVVM can make this simpler

What if there is a framework that can be run side by side with ASP.NET Web Forms in one application, but works also with the newest versions of ASP.NET Core?

It would make so many things easier. You will have just one project to deploy. There will be no changes in the deployment model – it will still be an ASP.NET application. You won’t need to take care about sharing the user identity between two apps because there won’t be two apps.

With DotVVM, it is quite easy. It was one of our initial thoughts that lead us to start with the project. If you haven’t heard of it – it is an open source MVVM framework supporting both ASP.NET and ASP.NET Core. It has nice Visual Studio integration and recently joined the .NET Foundation.

How does the migration work?

You can install DotVVM NuGet package in the Web Forms application and it will run side by side with the ASPX pages that are in the project.

From the deployment perspective, there are no changes – it is still the same ASP.NET application that gets deployed to the server as usual.

You can start with copying the Web Forms master page and converting it in the DotVVM syntax. It is different, but not much – most of the controls have the same names, except that you are using the MVVM approach. Use the same CSS so the users won’t notice the change.

Then, you can start rewriting all the pages one by one from Web Forms to DotVVM. DotVVM contains similar controls like GridView, Repeater, FileUpload and more. The most difficult part will be extracting the business logic from the ASPX code behind to the DotVVM viewmodel, but it is still C#.

If your business layer was propely separated, it should be trivial. If not, take this as an opportunity to do the refactoring and get the cleaner code. Thanks to the MVVM approach, your viewmodels will be testable and the overall quality of the application will greatly improve.

DotVVM pages will share the environment with the ASP.NET ones, including the current user identity. You won’t need to expose your business logic through a REST API, you can keep the same code interacting with the database.

At each point of the process, the application works, can be extended with new features, and can be deployed. The team is not locked to the migration and can do other things simultaneously.

After a few months, when all the ASPX pages are rewritten in DotVVM, you will be able to create a new ASP.NET Core project, move all DotVVM pages and viewmodels into it and use them with .NET Core. The syntax of DotVVM is the same on both platforms.

If you have been using Forms Authentication in Web Forms, you will need to switch it to ASP.NET Core Cookies, but that should be an easy-enough change.

Are there any samples?

Yes, I have created a GitHub repo which describes the process in detail. There are five branches, each one displaying one of the steps.

In the first one, there is a simple ASP.NET Web Forms application. In the last one, there is the same app rewritten in DotVVM and running on .NET Core.

We have used this way to migrate several Web Forms applications. If the business layer is separated properly, rewrite on one page takes about 1 hour in average. If the business logic is tighen up with the UI, it can take significantly more time, but it can be a way to improving the application testability and I think it is worth – even poorly written apps can be saved using this way.

What if I need help?

We’ll be happy to help you. You can also contact the DotVVM team on our Gitter chat. Check out the DotVVM documentation and the cheat-sheet of differences between Web Forms and DotVVM.

Recently, I have been doing a few live streams with Michal Altair Valasek, fellow MVP from the Czech Republic. We took his AskMe demo app which shows how to build a non-trivial web app in ASP.NET Core, and made a version built in DotVVM.

These streams were in Czech language, but I got some requests to make live streams in English. So this time, I will be streaming in English, and I will try to fix some issues in DotVVM and bring a few new features in the framework.

The stream will be on my personal Twitch on Thursday 4/4/2019 at 7:30 PM CEST.

Watch TomasHerceg's live video on www.twitch.tv

Yesterday, we got a question from one of DotVVM customers. He was using the Business Pack GridView with the inline editing feature and asked us how to allow the user to save changes in the row by pressing Enter.

Default button in forms

DotVVM itself doesn’t include any specific functionality to handle the keyboard actions – we rely on default behavior in HTML.

The situation is quite easy to solve when you create a simple form – to make the button to respond to the Enter key, you need to make it a “submit” button, and it needs to be in a <form> element.

<form>
    <div>
        <label>User Name</label>
        <dot:TextBox Text="{value: UserName}" />
    </div>
    <div>
        <label>Password</label>
        <dot:TextBox Text="{value: Password}" Type="Password" />
    </div>

    <div>
        <dot:Button Text="Sign In" Click="{command: SignIn()}"
                    IsSubmitButton="true" />
    </div>
</form>

The only thing you need to do is to set IsSubmitButton to true so the button will add type=”submit”. And of course, the form fields and the button must be inside the <form> element.

Modal dialogs and GridView inline editing

A little bit interesting situation occurs in modal dialogs and GridView control where you want to allow the users to edit a single row and save the changes on Enter.

The ModalDialog control has the ContentTemplate and FooterTemplate child elements, so you will have the form fields in one template and the save button in the other. You would need to put the entire modal dialog in a <form> element to make it work, and since forms in HTML cannot be nested, it might be an issue if you have more complicated scenarios.

Using the default button while editing data in GridView is completely impossible to do because the table row is <tr> and you cannot place <form> inside. You would have to put the entire table in the <form> element which is not nice and there might be multiple submit buttons if you want to allow the user to edit any row.

Moreover, there is no standard way to react to the Escape key if the user wants to cancel the edit. 

Extending DotVVM

It might be easy enough to google for a piece of jQuery code which will find the <input> elements in the form, catch the Enter press and click the correct button.

However, it is not difficult to write a generic solution for this problem and make it reusable. Basically, we need to define a container in which the Enter and Escape keys will be redirected to a particular “default” or “cancel” button. Something like the <form> element does, but even if it’s not the <form>.

In DotVVM, you can declare attached properties that can be added to any HTML element or DotVVM control. It is the same concept as attached properties in WPF or other XAML-based frameworks.

The attached property in DotVVM can render additional HTML attributes or Knockout data-bindings to the element or control on which it is applied.

What I want to achieve is something like this:

<tr data-bind="dotvvm-formhelpers-defaultbuttoncontainer: true">
    ...
    <td>
        <dot:Button Text="Save" ...
                    data-dotvvm-formhelpers-defaultbutton="true" />
        <dot:Button Text="Cancel" ... 
                    data-dotvvm-formhelpers-cancelbutton="true" />
    </td>
</tr>

The <tr> element specifies my custom Knockout binding handler which catches all Enter and Escape key presses from its children. If the Enter is pressed inside the <tr> element, this handler will find the control marked with data-dotvvm-formhelpers-defaultbutton attribute and clicks on it. A similar thing will be done for the Escape key, only the data attribute is different.

I didn’t want to use the button IDs of as there will be multiple rows in the grid and I would need to generate unique IDs for the buttons. Marking the control with the data attribute looks nicer to me.

I am setting all attributes and binding handlers to true. Actually, their values are not important at all because they are not used, but I needed something to be there. 

The binding handler should also stop the propagation of the event because the grid may be in a modal dialog which might want to use this concept too and we don’t want to submit two things with one press of Enter.

So first, let’s declare the attached properties so we can use them in DotVVM markup:

[ContainsDotvvmProperties]
public class FormHelpers
{
    [AttachedProperty(typeof(bool))]
    [MarkupOptions(AllowBinding = false)]
    public static readonly DotvvmProperty DefaultButtonContainerProperty
        = DelegateActionProperty<bool>.Register<FormHelpers>("DefaultButtonContainer", AddDefaultButtonContainer);

    [AttachedProperty(typeof(bool))]
    [MarkupOptions(AllowBinding = false)]
    public static readonly DotvvmProperty IsDefaultButtonProperty
        = DelegateActionProperty<bool>.Register<FormHelpers>("IsDefaultButton", AddIsDefaultButton);

    [AttachedProperty(typeof(bool))]
    [MarkupOptions(AllowBinding = false)]
    public static readonly DotvvmProperty IsCancelButtonProperty
        = DelegateActionProperty<bool>.Register<FormHelpers>("IsCancelButton", AddIsCancelButton);


    private static void AddDefaultButtonContainer(IHtmlWriter writer, IDotvvmRequestContext context, DotvvmProperty property, DotvvmControl control)
    {
        writer.AddKnockoutDataBind("dotvvm-formhelpers-defaultbuttoncontainer", "true");
    }

    private static void AddIsDefaultButton(IHtmlWriter writer, IDotvvmRequestContext context, DotvvmProperty property, DotvvmControl control)
    {
        writer.AddAttribute("data-dotvvm-formhelpers-defaultbutton", "true");
    }

    private static void AddIsCancelButton(IHtmlWriter writer, IDotvvmRequestContext context, DotvvmProperty property, DotvvmControl control)
    {
        writer.AddAttribute("data-dotvvm-formhelpers-cancelbutton", "true");
    }
}

As you can see, I have added the FormHelpers class in the project. It contains three attached properties:

  • DefaultButtonContainer is used to mark the element in which the keys should be handled.
  • IsDefaultButton is used to mark the default button inside the container – it will respond to the Enter key.
  • IsCancelButton is used to mark the cancel button inside the container – it will respond to the Escape key.

The DelegateActionProperty.Register allows to create a DotVVM property that calls a method before the element is rendered. This is the right place for us to render the Knockout data-bind expression for the first property, and the data attributes for the other properties.

Notice that the class is marked with the ContainsDotvvmProperties attribute. This is necessary for DotVVM to be able to discover these properties when the application starts.

The binding handler

All the magic happens inside the Knockout binding handler. It is a very powerful tool for extensibility and if you learn how to create your own binding handlers, you’ll get to the next level of interactivity. And thanks to DotVVM and its concept of resources and controls, it is very easy to bundle these binding handlers in a DLL and reuse them in multiple projects.

ko.bindingHandlers["dotvvm-formhelpers-defaultbuttoncontainer"] = {
    init: function (element, valueAccessor, allBindings, viewModel, bindingContext) {
        $(element).keyup(function (e) {
            var buttons = [];
            if (e.which === 13) {
                buttons = $(element).find("*[data-dotvvm-formhelpers-defaultbutton=true]");
            } else if (e.which === 27) {
                buttons = $(element).find("*[data-dotvvm-formhelpers-cancelbutton=true]");
            }

            if (buttons.length > 0) {
                $(e.target).blur();
                $(buttons[0]).click();
                e.stopPropagation();
            }
        });
    },
    update: function (element, valueAccessor, allBindings, viewModel, bindingContext) {
    }
};

The binding handler is just an object with init and update functions. The init is called whenever an element with data-bind=”dotvvm-formhelpers-defaultbuttoncontainer: …” appears in the page. It doesn’t matter if the element is there from the beginning or if it appears later (for example when a new row is added to the Grid). It is called in all these cases.

The update function is called whenever the value of the expression in the data-bind attribute changes. Since we always have true here, we don’t need anything in the update function.

As you can see, I just subscribed to the keyup event on the element which gets this binding handler. This event bubbles from the control which received the key press to the root of the document. If the key code is 13 (Enter) or 27 (Escape), I look for the button with the correct data attribute.

If there is such a button (or possibly more of them), I click on it and stop propagation of the event.

I need to call blur before clicking the button because when the user changes the value of a text field, it is written in the viewmodel when the control loses focus. I need to trigger this event manually before the click event is triggered on the button. Otherwise, the new value wouldn’t be stored in the viewmodel at the right time.

The last thing is to register this script file so DotVVM knows about it. Place this code in DotvvmStartup.cs:

config.Resources.Register("FormHelpers", new ScriptResource()
{
    Location = new UrlResourceLocation("~/FormHelpers.js"),
    Dependencies = new [] { "knockout", "jquery" }
});

We also must make sure that the script is present in the page where we use the attached properties. The easiest way is to add the following control in the page (or in the master page if you use this often).

<dot:RequiredResource Name="FormHelpers" />

Currently, we don’t have any mechanism to tell the property to request this resource automatically, so you need to include the resource manually.


Using the attached properties

Now the markup can look like this:

<tr FormHelpers.DefaultButtonContainer>
    ...
    <td>
        <dot:Button Text="Save" ...
                    FormHelpers.IsDefaultButton />
        <dot:Button Text="Cancel" ... 
                    FormHelpers.IsCancelButton />
    </td>
</tr>

The nice thing about the true values of these properties is that you don’t need to write =”true” in the markup, you can just specify the property name.

But wait, how do I apply the attached property to the GridView table row? The <tr> element is rendered by the control itself, it is not in my code.

Luckily, there is the RowDecorators property which allows to “decorate” the <tr> element rendered by the control. And there is also EditRowDecorators which is used for the rows which are in the inline editing mode.

<bp:GridView DataSource="{value: Countries}" InlineEditing="true">
    <Columns>
        <bp:GridViewTextColumn ValueBinding="{value: Id}" HeaderText="ID" IsEditable="false" />
        <bp:GridViewTextColumn ValueBinding="{value: Name}" HeaderText="Name" />
        <bp:GridViewTemplateColumn>
            <ContentTemplate>
                <dot:Button Text="Edit" Click="{command: _root.Edit(_this)}" />
            </ContentTemplate>
            <EditTemplate>
                <dot:Button Text="Save" Click="{command: _root.Save(_this)}" FormHelpers.IsDefaultButton />
                <dot:Button Text="Cancel" Click="{command: _root.CancelEdit(_this)}" FormHelpers.IsCancelButton />
            </EditTemplate>
        </bp:GridViewTemplateColumn>
    </Columns>
    <EditRowDecorators>
        <dot:Decorator FormHelpers.DefaultButtonContainer />
    </EditRowDecorators>
</bp:GridView>

As you can see, I have used <dot:Decorator> to apply the FormHelpers.DefaultButtonContainer property to the rows.

The buttons are rendered in the EditTemplate and I have just applied the properties to them.

GridView with inline edit mode

Now the user can change the value and use Enter and Escape keys to click Save or Cancel button.


Conclusion

Knockout binding handlers are very powerful and can help to improve the user experience. In fact, most of the DotVVM controls are just a cleverly written binding handlers.

Thanks to the attached properties and strong-typing nature of DotVVM, you also have IntelliSense in the editor, and you can bundle these pieces of infrastructure in your custom DLLs or NuGet packages and reuse them in multiple projects.

IntelliSense for attached properties

The FormHelpers class may be included as part of future releases of DotVVM Business Pack since this is quite common user requirement.

If you have any questions, feel free to ask on our Gitter chat.

In the previous blog post, I wrote about replacing the authentication with OWIN Security libraries. In this part, I would like to introduce DotVVM – an open source framework which allows building web applications using the MVVM pattern and is very easy to use. I will also show how you can modernize old Web Forms applications using DotVVM.

Parts of the series


I have started the DotVVM project when I noticed that Web Forms are not going to be supported on ASP.NET Core. I realized that there are thousands of companies still heavily relying on legacy Web Forms applications.

In many cases, it is just not possible to rewrite the applications from scratch. They have often been developed for more than 10 years and the idea of rewriting them in less than half of that time is ridiculous. Especially in the current world of over-complicated JavaScript frameworks which add tremendous amount of complexity and make almost impossible to be a full-stack web developer.


How does DotVVM work?

The idea behind DotVVM was quite simple – to build a successor of ASP.NET Web Forms, with support of .NET Core, and get rid of the biggest pain points Web Forms had.

No ViewState

Web Forms store state of all controls in the page in a cryptic hidden field which is called viewstate. Although it is possible to specify which controls can use it and which cannot, still, it is not possible to get rid of it completely, and some controls stop working without it.

In DotVVM, the controls in the page are stateless. The page is backed by a viewmodel, which is a C# class you need to write, and all the state is stored in the viewmodel instance. The purpose of viewmodel is to store page state and handle user actions (clicking a button for example).

You can make postbacks in DotVVM, same as in Web Forms. But you can control what will be transferred from the client to the server – instead of hundreds of kilobites of encrypted state, it is a plain JSON object which corresponds with the C# viewmodel. You can specify bind direction to particular properties, so they won’t be transferred in both ways.

And what’s best – for most actions, you don’t need to do a full postback. DotVVM 2.0 brought REST API bindings, which can significantly reduce the amount of data in the viewmodel, and Static Command Services, which can also avoid transferring the entire viewmodel to the server and back. And we are working on even more interesting things right now.

Clean HTML

Web Forms controls contain many properties to change how the controls look like – FontSize, BackColor and so on. These properties emit inline styles, which is considered as a bad practise, and the HTML rendered by some controls is difficult to style using CSS.

DotVVM relies on CSS. All controls produce as simple HTML as possible, and everything is easily styleable. You can specify which HTML elements should be produced by some controls (Repeater, for example), so you can use the control to render unordered lists, or just a bunch of divs. Also, we have documented what each control produces.

Testability & Better Architecture

The viewmodels in DotVVM don’t reference controls from the UI – actually, they even don’t know which control will use a particular property. Thanks to the data-binding, any change made to the properties will be reflected by the controls, and vice-versa. This makes the viewmodels testable – you can just create an instance of the viewmodel, set some properties, call a method and make sure it did what it should do.

Also, DotVVM natively supports dependency injection, action filters and many other concepts known from MVC or ASP.NET Core. It supports both old ASP.NET and new ASP.NET Core, and can be used together with any other framework in one application. This is super-interesting for the rest of this article.


How can DotVVM help with existing Web Form applications?

If you need to extend Web Forms applications with new pages or areas, you should definitely consider writing these new parts in DotVVM. The syntax is cleaner, you can access your business layer the same way as in Web Forms, and finally, many things are easier to do in DotVVM.

If you know that you will need to run this application next five years or more, you may use DotVVM to modernize it, and possibly upgrade to .NET Core. You can take Web Forms pages and rewrite them one by one while keeping the entire application still working. After a while, when you get rid of all Web Forms pages, you might be able to upgrade the project to .NET Core (DotVVM supports both .NET Framework and .NET Core). DotVVM is a live project and is constantly adding new features, so your platform will be in sync with the world of web development which changes every year.


How to start?

I have started building a NuGet package called DotVVM.Adapters.WebForms. It will contain several controls that allow closer integration of the two technologies.

  • There are dotvvm:RouteLink and webforms:RouteLink controls, which can render a link to DotVVM or ASP.NET Web Forms route, which is helpful when making a transition between the two parts.
  • Currently, I am working on a control which can host DotVVM user control and its viewmodel in a Web Forms page. This is more difficult to do as it requires some changes in the framework itself, but still, it would be a nice step forward.

The project is hosted on GitHub and I am looking for a feedback from community – it will help us to choose the next steps and prioritize the ideas we have.

I have also created a DotVVM cheat sheet for Web Forms developers so you can see the differences between these two technologies.


Installing DotVVM package

To integrate DotVVM with Web Forms, you need to perform the following steps:

  1. Install DotVVM.Owin and Microsoft.Owin.Host.SystemWeb packages in the project.

  2. Open the csproj file in a text editor and add change the ProjectTypeGuids element to this:
    <ProjectTypeGuids>{94EE71E2-EE2A-480B-8704-AF46D2E58D94};{349c5851-65df-11da-9384-00065b846f21};{fae04ec0-301f-11d3-bf4b-00c04f79efbc}</ProjectTypeGuids>

  3. Add DotvvmStartup.cs file in the project. This file contains the configuration of DotVVM:
    public class DotvvmStartup : IDotvvmStartup, IDotvvmServiceConfigurator
    {
        public void Configure(DotvvmConfiguration config, string applicationPath)
        {
            config.AddWebFormsAdapterControls();
    
            RegisterRoutes(config, applicationPath);
            RegisterControls(config, applicationPath);
            RegisterResources(config, applicationPath);
        }
    
        private void RegisterRoutes(DotvvmConfiguration config, string applicationPath)
        {
            // ...
        }
    
        private void RegisterControls(DotvvmConfiguration config, string applicationPath)
        {
            
        }
    
        private void RegisterResources(DotvvmConfiguration config, string applicationPath)
        {
            
        }
    
        public void ConfigureServices(IDotvvmServiceCollection services)
        {
        }
    }

  4. Add Startup.cs in the project. This file contains the OWIN pipeline configuration. You may already have this file in the project, if you are using SignalR or another OWIN-based library.
    [assembly: OwinStartup(typeof(YourNamespace.Startup))]
    
    namespace YourNamespace
    {
        public class Startup
        {
            public void Configuration(IAppBuilder app)
            {
                app.UseDotVVM<DotvvmStartup>(HostingEnvironment.ApplicationPhysicalPath);
            }
        }
    }

  5. Create Views and ViewModels folders somewhere in the project.

  6. Create a DotVVM Master Page and copy all contents of ASP.NET Web Forms Master Page. The goal is to make DotVVM page look exactly the same as the Web Forms one. You need to have two – one for Web Forms, one for DotVVM. It is not possible to reuse it.

  7. Replace all links (e.g. in the menu) with <webforms:RouteLink> controls.

  8. Replace <asp:ContentPlaceHolder> with <dot:ContentPlaceHolder>.

  9. Look for runat=”server” in all controls and replace all Web Forms controls with their DotVVM equivalents:
    1. There are no HyperLink, Label, Image, Panel controls in DotVVM – use their HTML equivalents.
    2. DotVVM doesn’t have controls like Menu or Calendar – you need to use HTML and CSS to make any menu you may need. We have the Calendar control in DotVVM Business Pack.
    3. Form controls (TextBox, CheckBox…), Repeater, FileUpload, GridView and many other controls have the same names.
    4. Replace all appearance properties (FontSize etc.) with proper CSS. I strongly recommend using LESS or SCSS.
    5. Replace all properties which are set from the code-behind, with data-binding, and place the corresponding properties in the master page viewmodel. If there are any values which cannot change while the page is loaded, you can use resource binding to render them directly in HTML.

    The migration shouldn't bee difficult - most of the master pages I have seen, are quite simple and use only basic controls.

  10. Start creating new pages in DotVVM using the master page. You can always make a link to a Web Forms page using <webforms:RouteLink> control, and you can always link to a DotVVM page using <dotvvm:RouteLink runat=”server”> control in a Web Forms page.

  11. Make sure the single-sign on works as expected. DotVVM should see the user identity even if you are using Forms Authentication. I strongly recommend to move to OWIN Security, which was described in the previous part.


Of course, there are so many Web Forms specific stuff that I couldn’t cover everything. However, I have tried to apply all these steps in 10 various Web Forms applications I made years ago, and I was able to integrate DotVVM very quickly.

If you try this approach, definitely let us know on our Gitter – we are very interested in any issues you might have run into. And if you have any ideas, what controls you’d like to have ported, we are listening.