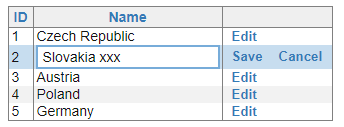
Yesterday, we got a question from one of DotVVM customers. He was using the Business Pack GridView with the inline editing feature and asked us how to allow the user to save changes in the row by pressing Enter.

Default button in forms

DotVVM itself doesn’t include any specific functionality to handle the keyboard actions – we rely on default behavior in HTML.

The situation is quite easy to solve when you create a simple form – to make the button to respond to the Enter key, you need to make it a “submit” button, and it needs to be in a <form> element.

<form>
    <div>
        <label>User Name</label>
        <dot:TextBox Text="{value: UserName}" />
    </div>
    <div>
        <label>Password</label>
        <dot:TextBox Text="{value: Password}" Type="Password" />
    </div>

    <div>
        <dot:Button Text="Sign In" Click="{command: SignIn()}"
                    IsSubmitButton="true" />
    </div>
</form>

The only thing you need to do is to set IsSubmitButton to true so the button will add type=”submit”. And of course, the form fields and the button must be inside the <form> element.

Modal dialogs and GridView inline editing

A little bit interesting situation occurs in modal dialogs and GridView control where you want to allow the users to edit a single row and save the changes on Enter.

The ModalDialog control has the ContentTemplate and FooterTemplate child elements, so you will have the form fields in one template and the save button in the other. You would need to put the entire modal dialog in a <form> element to make it work, and since forms in HTML cannot be nested, it might be an issue if you have more complicated scenarios.

Using the default button while editing data in GridView is completely impossible to do because the table row is <tr> and you cannot place <form> inside. You would have to put the entire table in the <form> element which is not nice and there might be multiple submit buttons if you want to allow the user to edit any row.

Moreover, there is no standard way to react to the Escape key if the user wants to cancel the edit. 

Extending DotVVM

It might be easy enough to google for a piece of jQuery code which will find the <input> elements in the form, catch the Enter press and click the correct button.

However, it is not difficult to write a generic solution for this problem and make it reusable. Basically, we need to define a container in which the Enter and Escape keys will be redirected to a particular “default” or “cancel” button. Something like the <form> element does, but even if it’s not the <form>.

In DotVVM, you can declare attached properties that can be added to any HTML element or DotVVM control. It is the same concept as attached properties in WPF or other XAML-based frameworks.

The attached property in DotVVM can render additional HTML attributes or Knockout data-bindings to the element or control on which it is applied.

What I want to achieve is something like this:

<tr data-bind="dotvvm-formhelpers-defaultbuttoncontainer: true">
    ...
    <td>
        <dot:Button Text="Save" ...
                    data-dotvvm-formhelpers-defaultbutton="true" />
        <dot:Button Text="Cancel" ... 
                    data-dotvvm-formhelpers-cancelbutton="true" />
    </td>
</tr>

The <tr> element specifies my custom Knockout binding handler which catches all Enter and Escape key presses from its children. If the Enter is pressed inside the <tr> element, this handler will find the control marked with data-dotvvm-formhelpers-defaultbutton attribute and clicks on it. A similar thing will be done for the Escape key, only the data attribute is different.

I didn’t want to use the button IDs of as there will be multiple rows in the grid and I would need to generate unique IDs for the buttons. Marking the control with the data attribute looks nicer to me.

I am setting all attributes and binding handlers to true. Actually, their values are not important at all because they are not used, but I needed something to be there. 

The binding handler should also stop the propagation of the event because the grid may be in a modal dialog which might want to use this concept too and we don’t want to submit two things with one press of Enter.

So first, let’s declare the attached properties so we can use them in DotVVM markup:

[ContainsDotvvmProperties]
public class FormHelpers
{
    [AttachedProperty(typeof(bool))]
    [MarkupOptions(AllowBinding = false)]
    public static readonly DotvvmProperty DefaultButtonContainerProperty
        = DelegateActionProperty<bool>.Register<FormHelpers>("DefaultButtonContainer", AddDefaultButtonContainer);

    [AttachedProperty(typeof(bool))]
    [MarkupOptions(AllowBinding = false)]
    public static readonly DotvvmProperty IsDefaultButtonProperty
        = DelegateActionProperty<bool>.Register<FormHelpers>("IsDefaultButton", AddIsDefaultButton);

    [AttachedProperty(typeof(bool))]
    [MarkupOptions(AllowBinding = false)]
    public static readonly DotvvmProperty IsCancelButtonProperty
        = DelegateActionProperty<bool>.Register<FormHelpers>("IsCancelButton", AddIsCancelButton);


    private static void AddDefaultButtonContainer(IHtmlWriter writer, IDotvvmRequestContext context, DotvvmProperty property, DotvvmControl control)
    {
        writer.AddKnockoutDataBind("dotvvm-formhelpers-defaultbuttoncontainer", "true");
    }

    private static void AddIsDefaultButton(IHtmlWriter writer, IDotvvmRequestContext context, DotvvmProperty property, DotvvmControl control)
    {
        writer.AddAttribute("data-dotvvm-formhelpers-defaultbutton", "true");
    }

    private static void AddIsCancelButton(IHtmlWriter writer, IDotvvmRequestContext context, DotvvmProperty property, DotvvmControl control)
    {
        writer.AddAttribute("data-dotvvm-formhelpers-cancelbutton", "true");
    }
}

As you can see, I have added the FormHelpers class in the project. It contains three attached properties:

  • DefaultButtonContainer is used to mark the element in which the keys should be handled.
  • IsDefaultButton is used to mark the default button inside the container – it will respond to the Enter key.
  • IsCancelButton is used to mark the cancel button inside the container – it will respond to the Escape key.

The DelegateActionProperty.Register allows to create a DotVVM property that calls a method before the element is rendered. This is the right place for us to render the Knockout data-bind expression for the first property, and the data attributes for the other properties.

Notice that the class is marked with the ContainsDotvvmProperties attribute. This is necessary for DotVVM to be able to discover these properties when the application starts.

The binding handler

All the magic happens inside the Knockout binding handler. It is a very powerful tool for extensibility and if you learn how to create your own binding handlers, you’ll get to the next level of interactivity. And thanks to DotVVM and its concept of resources and controls, it is very easy to bundle these binding handlers in a DLL and reuse them in multiple projects.

ko.bindingHandlers["dotvvm-formhelpers-defaultbuttoncontainer"] = {
    init: function (element, valueAccessor, allBindings, viewModel, bindingContext) {
        $(element).keyup(function (e) {
            var buttons = [];
            if (e.which === 13) {
                buttons = $(element).find("*[data-dotvvm-formhelpers-defaultbutton=true]");
            } else if (e.which === 27) {
                buttons = $(element).find("*[data-dotvvm-formhelpers-cancelbutton=true]");
            }

            if (buttons.length > 0) {
                $(e.target).blur();
                $(buttons[0]).click();
                e.stopPropagation();
            }
        });
    },
    update: function (element, valueAccessor, allBindings, viewModel, bindingContext) {
    }
};

The binding handler is just an object with init and update functions. The init is called whenever an element with data-bind=”dotvvm-formhelpers-defaultbuttoncontainer: …” appears in the page. It doesn’t matter if the element is there from the beginning or if it appears later (for example when a new row is added to the Grid). It is called in all these cases.

The update function is called whenever the value of the expression in the data-bind attribute changes. Since we always have true here, we don’t need anything in the update function.

As you can see, I just subscribed to the keyup event on the element which gets this binding handler. This event bubbles from the control which received the key press to the root of the document. If the key code is 13 (Enter) or 27 (Escape), I look for the button with the correct data attribute.

If there is such a button (or possibly more of them), I click on it and stop propagation of the event.

I need to call blur before clicking the button because when the user changes the value of a text field, it is written in the viewmodel when the control loses focus. I need to trigger this event manually before the click event is triggered on the button. Otherwise, the new value wouldn’t be stored in the viewmodel at the right time.

The last thing is to register this script file so DotVVM knows about it. Place this code in DotvvmStartup.cs:

config.Resources.Register("FormHelpers", new ScriptResource()
{
    Location = new UrlResourceLocation("~/FormHelpers.js"),
    Dependencies = new [] { "knockout", "jquery" }
});

We also must make sure that the script is present in the page where we use the attached properties. The easiest way is to add the following control in the page (or in the master page if you use this often).

<dot:RequiredResource Name="FormHelpers" />

Currently, we don’t have any mechanism to tell the property to request this resource automatically, so you need to include the resource manually.


Using the attached properties

Now the markup can look like this:

<tr FormHelpers.DefaultButtonContainer>
    ...
    <td>
        <dot:Button Text="Save" ...
                    FormHelpers.IsDefaultButton />
        <dot:Button Text="Cancel" ... 
                    FormHelpers.IsCancelButton />
    </td>
</tr>

The nice thing about the true values of these properties is that you don’t need to write =”true” in the markup, you can just specify the property name.

But wait, how do I apply the attached property to the GridView table row? The <tr> element is rendered by the control itself, it is not in my code.

Luckily, there is the RowDecorators property which allows to “decorate” the <tr> element rendered by the control. And there is also EditRowDecorators which is used for the rows which are in the inline editing mode.

<bp:GridView DataSource="{value: Countries}" InlineEditing="true">
    <Columns>
        <bp:GridViewTextColumn ValueBinding="{value: Id}" HeaderText="ID" IsEditable="false" />
        <bp:GridViewTextColumn ValueBinding="{value: Name}" HeaderText="Name" />
        <bp:GridViewTemplateColumn>
            <ContentTemplate>
                <dot:Button Text="Edit" Click="{command: _root.Edit(_this)}" />
            </ContentTemplate>
            <EditTemplate>
                <dot:Button Text="Save" Click="{command: _root.Save(_this)}" FormHelpers.IsDefaultButton />
                <dot:Button Text="Cancel" Click="{command: _root.CancelEdit(_this)}" FormHelpers.IsCancelButton />
            </EditTemplate>
        </bp:GridViewTemplateColumn>
    </Columns>
    <EditRowDecorators>
        <dot:Decorator FormHelpers.DefaultButtonContainer />
    </EditRowDecorators>
</bp:GridView>

As you can see, I have used <dot:Decorator> to apply the FormHelpers.DefaultButtonContainer property to the rows.

The buttons are rendered in the EditTemplate and I have just applied the properties to them.

GridView with inline edit mode

Now the user can change the value and use Enter and Escape keys to click Save or Cancel button.


Conclusion

Knockout binding handlers are very powerful and can help to improve the user experience. In fact, most of the DotVVM controls are just a cleverly written binding handlers.

Thanks to the attached properties and strong-typing nature of DotVVM, you also have IntelliSense in the editor, and you can bundle these pieces of infrastructure in your custom DLLs or NuGet packages and reuse them in multiple projects.

IntelliSense for attached properties

The FormHelpers class may be included as part of future releases of DotVVM Business Pack since this is quite common user requirement.

If you have any questions, feel free to ask on our Gitter chat.

Recently, I have run into an interesting issue with one of my websites – it runs in Azure App Service and I was using automated deployments from VSTS Azure DevOps.

After the website was deployed, it didn’t start – I was getting HTTP 502.


Diagnostics

When I deploy something into Azure App Service and the app doesn’t start, I go to the Kudu console first (https://nameofyoursite.scm.azurewebsites.net) and look in LogFiles/eventlog.xml.

If there is a problem with app startup (configuration error, missing DLLs or an exception thrown during the initialization of the application), there is a chance the error will be in this file.

If you are using Application Insights and the exception occurs on startup, it will probably not be recorded because the Application Insights DLLs may not be loaded and initialized.

You can also turn on filesystem logging in Azure portal to find more details.


Cannot create directory? What?

A quick look in eventlog.xml using Kudu console told me that I am getting FileNotFoundException (Could not find file 'D:\home\site\wwwroot\Temp'.) from Directory.CreateDirectory.

It was quite strange – the path was correct and the function should actually create that directory instead of complaining that the path doesn’t exist.

In general, it is not the best idea for a web app to write in the filesystem, but most web apps does this, at least they write some log files, store uplaoded files temporarily before they are processed and so on.


After a few minutes, I discovered another weird thing – when I was browsing the wwwroot folder in Kudu, the Temp folder was not there, and when I tried to create it using Kudu, I got the following error:

409 Conflict: Cannot delete directory. It is either not empty or access is not allowed.

What? I was creating a directory, not deleting anything.


I tried to use mkdir Temp in the command line, but got the following:

The system cannot find the file specified.


Desperate enough, I tried to connect using FTP and the folder was there! I tried to delete it, but I got the same results from the app and from the Kudu.

Then I noticed that FTP shows me old versions of some files. So the app must have been running from a different folder. I double checked the FTP and Kudu addresses, but they were the same.


What was even more strange – the previous version of the web app did the same writes in the filesystem and it worked. The startup code didn’t change at all and the app worked normally before the deployment.

What has changed? What have I done?


Azure App Service Deploy Task

The only difference was the deployment process. The previous version of the website was deployed few months ago directly from Visual Studio.

This time, I tried to deploy using Azure DevOps which has a very nice deployment task for that.  It worked for the test site so I just create a different environment for production and deployed there.

I have looked at the definition of the deployment task, but haven’t found anything unusual – it was quite straight-forward – take the build artifacts and push them in the Azure App Service.

image


What now? Because it was a production site with some traffic, I decided to just deploy from Visual Studio to fix the error quickly, and then dive into the cause of the issue. So I hit Publish and couldn’t believe the error message:

Invalid access to memory location.

I started googling and finally found the answer.


Run from Package

The 4.* version of the Azure App Service Deploy task is using Run from Package application mode by default, which means that it uploads a ZIP file with the app (they call it Zip Deploy) and sets WEBSITE_RUN_FROM_ZIP application setting to 1.

The application then runs from the ZIP package - there is a virtual file system which makes the application and Kudu console see the contents of the ZIP package in the wwwroot folder.

The virtual file system it is not used when you connect using FTP, so that’s why I was seing different files in the folder.

And because the application runs from the ZIP package, it cannot write to its filesystem. Sadly, the error messages produced by I/O functions are not helpful.

Since most web apps I have seen write in their filesystem, this is quite significant change of behavior, and making it a default option in Azure DevOps deployment task can lead to a lot of confusion.

I didn’t know about this feature at all, and what is more, the setting is hidden in VSTS task so I didn’t notice it. You need to expand the Additional Deployment Options section and click on the Select deployment method checkbox, which is unchecked by default. Only after these two clicks, you can see the dropdown with deployment methods – ZipDeploy is the default one.

I needed to change it to use WebDeploy so the application files will be stored as normal files and the application can write in the filesystem like it could before.

image


And don’t forget to remove the WEBSITE_RUN_FROM_ZIP application setting, otherwise the deployment will fail with Invalid access to memory location error.

In the previous blog post, I wrote about replacing the authentication with OWIN Security libraries. In this part, I would like to introduce DotVVM – an open source framework which allows building web applications using the MVVM pattern and is very easy to use. I will also show how you can modernize old Web Forms applications using DotVVM.

Parts of the series


I have started the DotVVM project when I noticed that Web Forms are not going to be supported on ASP.NET Core. I realized that there are thousands of companies still heavily relying on legacy Web Forms applications.

In many cases, it is just not possible to rewrite the applications from scratch. They have often been developed for more than 10 years and the idea of rewriting them in less than half of that time is ridiculous. Especially in the current world of over-complicated JavaScript frameworks which add tremendous amount of complexity and make almost impossible to be a full-stack web developer.


How does DotVVM work?

The idea behind DotVVM was quite simple – to build a successor of ASP.NET Web Forms, with support of .NET Core, and get rid of the biggest pain points Web Forms had.

No ViewState

Web Forms store state of all controls in the page in a cryptic hidden field which is called viewstate. Although it is possible to specify which controls can use it and which cannot, still, it is not possible to get rid of it completely, and some controls stop working without it.

In DotVVM, the controls in the page are stateless. The page is backed by a viewmodel, which is a C# class you need to write, and all the state is stored in the viewmodel instance. The purpose of viewmodel is to store page state and handle user actions (clicking a button for example).

You can make postbacks in DotVVM, same as in Web Forms. But you can control what will be transferred from the client to the server – instead of hundreds of kilobites of encrypted state, it is a plain JSON object which corresponds with the C# viewmodel. You can specify bind direction to particular properties, so they won’t be transferred in both ways.

And what’s best – for most actions, you don’t need to do a full postback. DotVVM 2.0 brought REST API bindings, which can significantly reduce the amount of data in the viewmodel, and Static Command Services, which can also avoid transferring the entire viewmodel to the server and back. And we are working on even more interesting things right now.

Clean HTML

Web Forms controls contain many properties to change how the controls look like – FontSize, BackColor and so on. These properties emit inline styles, which is considered as a bad practise, and the HTML rendered by some controls is difficult to style using CSS.

DotVVM relies on CSS. All controls produce as simple HTML as possible, and everything is easily styleable. You can specify which HTML elements should be produced by some controls (Repeater, for example), so you can use the control to render unordered lists, or just a bunch of divs. Also, we have documented what each control produces.

Testability & Better Architecture

The viewmodels in DotVVM don’t reference controls from the UI – actually, they even don’t know which control will use a particular property. Thanks to the data-binding, any change made to the properties will be reflected by the controls, and vice-versa. This makes the viewmodels testable – you can just create an instance of the viewmodel, set some properties, call a method and make sure it did what it should do.

Also, DotVVM natively supports dependency injection, action filters and many other concepts known from MVC or ASP.NET Core. It supports both old ASP.NET and new ASP.NET Core, and can be used together with any other framework in one application. This is super-interesting for the rest of this article.


How can DotVVM help with existing Web Form applications?

If you need to extend Web Forms applications with new pages or areas, you should definitely consider writing these new parts in DotVVM. The syntax is cleaner, you can access your business layer the same way as in Web Forms, and finally, many things are easier to do in DotVVM.

If you know that you will need to run this application next five years or more, you may use DotVVM to modernize it, and possibly upgrade to .NET Core. You can take Web Forms pages and rewrite them one by one while keeping the entire application still working. After a while, when you get rid of all Web Forms pages, you might be able to upgrade the project to .NET Core (DotVVM supports both .NET Framework and .NET Core). DotVVM is a live project and is constantly adding new features, so your platform will be in sync with the world of web development which changes every year.


How to start?

I have started building a NuGet package called DotVVM.Adapters.WebForms. It will contain several controls that allow closer integration of the two technologies.

  • There are dotvvm:RouteLink and webforms:RouteLink controls, which can render a link to DotVVM or ASP.NET Web Forms route, which is helpful when making a transition between the two parts.
  • Currently, I am working on a control which can host DotVVM user control and its viewmodel in a Web Forms page. This is more difficult to do as it requires some changes in the framework itself, but still, it would be a nice step forward.

The project is hosted on GitHub and I am looking for a feedback from community – it will help us to choose the next steps and prioritize the ideas we have.

I have also created a DotVVM cheat sheet for Web Forms developers so you can see the differences between these two technologies.


Installing DotVVM package

To integrate DotVVM with Web Forms, you need to perform the following steps:

  1. Install DotVVM.Owin and Microsoft.Owin.Host.SystemWeb packages in the project.

  2. Open the csproj file in a text editor and add change the ProjectTypeGuids element to this:
    <ProjectTypeGuids>{94EE71E2-EE2A-480B-8704-AF46D2E58D94};{349c5851-65df-11da-9384-00065b846f21};{fae04ec0-301f-11d3-bf4b-00c04f79efbc}</ProjectTypeGuids>

  3. Add DotvvmStartup.cs file in the project. This file contains the configuration of DotVVM:
    public class DotvvmStartup : IDotvvmStartup, IDotvvmServiceConfigurator
    {
        public void Configure(DotvvmConfiguration config, string applicationPath)
        {
            config.AddWebFormsAdapterControls();
    
            RegisterRoutes(config, applicationPath);
            RegisterControls(config, applicationPath);
            RegisterResources(config, applicationPath);
        }
    
        private void RegisterRoutes(DotvvmConfiguration config, string applicationPath)
        {
            // ...
        }
    
        private void RegisterControls(DotvvmConfiguration config, string applicationPath)
        {
            
        }
    
        private void RegisterResources(DotvvmConfiguration config, string applicationPath)
        {
            
        }
    
        public void ConfigureServices(IDotvvmServiceCollection services)
        {
        }
    }

  4. Add Startup.cs in the project. This file contains the OWIN pipeline configuration. You may already have this file in the project, if you are using SignalR or another OWIN-based library.
    [assembly: OwinStartup(typeof(YourNamespace.Startup))]
    
    namespace YourNamespace
    {
        public class Startup
        {
            public void Configuration(IAppBuilder app)
            {
                app.UseDotVVM<DotvvmStartup>(HostingEnvironment.ApplicationPhysicalPath);
            }
        }
    }

  5. Create Views and ViewModels folders somewhere in the project.

  6. Create a DotVVM Master Page and copy all contents of ASP.NET Web Forms Master Page. The goal is to make DotVVM page look exactly the same as the Web Forms one. You need to have two – one for Web Forms, one for DotVVM. It is not possible to reuse it.

  7. Replace all links (e.g. in the menu) with <webforms:RouteLink> controls.

  8. Replace <asp:ContentPlaceHolder> with <dot:ContentPlaceHolder>.

  9. Look for runat=”server” in all controls and replace all Web Forms controls with their DotVVM equivalents:
    1. There are no HyperLink, Label, Image, Panel controls in DotVVM – use their HTML equivalents.
    2. DotVVM doesn’t have controls like Menu or Calendar – you need to use HTML and CSS to make any menu you may need. We have the Calendar control in DotVVM Business Pack.
    3. Form controls (TextBox, CheckBox…), Repeater, FileUpload, GridView and many other controls have the same names.
    4. Replace all appearance properties (FontSize etc.) with proper CSS. I strongly recommend using LESS or SCSS.
    5. Replace all properties which are set from the code-behind, with data-binding, and place the corresponding properties in the master page viewmodel. If there are any values which cannot change while the page is loaded, you can use resource binding to render them directly in HTML.

    The migration shouldn't bee difficult - most of the master pages I have seen, are quite simple and use only basic controls.

  10. Start creating new pages in DotVVM using the master page. You can always make a link to a Web Forms page using <webforms:RouteLink> control, and you can always link to a DotVVM page using <dotvvm:RouteLink runat=”server”> control in a Web Forms page.

  11. Make sure the single-sign on works as expected. DotVVM should see the user identity even if you are using Forms Authentication. I strongly recommend to move to OWIN Security, which was described in the previous part.


Of course, there are so many Web Forms specific stuff that I couldn’t cover everything. However, I have tried to apply all these steps in 10 various Web Forms applications I made years ago, and I was able to integrate DotVVM very quickly.

If you try this approach, definitely let us know on our Gitter – we are very interested in any issues you might have run into. And if you have any ideas, what controls you’d like to have ported, we are listening.

In the previous blog post, I was writing about the problems of legacy ASP.NET Web Forms applications. It is often not possible to rewrite them from scratch, as new features should be introduced every month, and I’d like to dig into one of the ways of modernizing these applications.

Parts of the series

In this part, I will write about how to replace Forms Authentication with OWIN Security middlewares. I needed to do this in one of my older Web Forms apps recently, because it was using Microsoft.WebPages.OAuth library to authenticate users using Facebook, Twitter and Google. This library was part of ASP.NET Web Pages and is very old, so it doesn’t support the current version of OAuth protocol.

OWIN, which was a new infrastructure for ASP.NET applications on .NET Framework, a predecessor of ASP.NET Core, supports various authentication middlewares, and besides Cookie Security Middleware which can replace Forms Authentication, there are also middlewares for all commonly used social networks and other authentication scenarios.


Forms Authentication

I have created a sample ASP.NET Web Forms application (it’s in ModernizingWebFormsSample.Auth folder) with a few pages and Forms Authentication.

It is using the built-in membership provider to store information about users. The database should be created automatically and it should reside in App_Data folder.

In Global.asax, there is a code which creates a default user account (e-mail: [email protected], password: Pa$$w0rd) when the application is launched. 

The Login.aspx page contains a login form made by the <asp:Login> control. This control uses the membership provider to validate the user credentials (by calling Membership.ValidateUser) and then it calls FormsAuthentication.SetAuthCookie to issue a cookie with an authentication token.

If you don’t want to use <asp:Login> control, you can always build the form by yourself and issue the authentication cookie manually by calling the methods mentioned above.


The concepts

If you are not familiar with how membership providers and identity in ASP.NET works, here is a brief explanation.

Almost every web application uses some concept of user accounts, often with different permissions and access levels.

The information about the users needs to be stored somewhere. Sometimes, the users are stored in a SQL database, sometimes, they are retrieved from Active Directory, and there are many other options.

Membership provider is an abstract mechanism that provides a unified API for the application no matter how and where exactly the user info is stored. The membership provider exposes methods for creating, editing and deleting users, validating, changing and resetting their passwords, and so on.

ASP.NET comes with a built-in membership provider, which stores user information in a SQL database which is located in App_Data folder (it can be changed in web.config).

You can implement your own membership provider to be able to store users in your own SQL database, or any other place. You just need to implement several methods like CreateUser, ValidateUser etc.

All ASP.NET controls that work with users (<asp:Login>, <asp:ChangePassword> etc.) work thanks to the concept of membership providers. If you haven’t heard about membership providers before, you are probably using the default one.

You should consider replacing membership providers by ASP.NET Identity, which provides much more options and features, but that’s another story - I will address it in some of the next parts of this series.


The authentication in ASP.NET can work in multiple modes. Most Web Forms applications are using Forms Authentication, which uses an authentication cookie. You can set the authentication mode in web.config, using the system.web/authentication element.


The authentication and membership providers are decoupled, so you should be able to use any authentication mode with any membership provider (or other solution, like ASP.NET Identity I have already mentioned).


OWIN

ASP.NET was always tightly integrated with IIS. It was quite difficult to run .NET web apps outside IIS. The reason for OWIN was to provide a modular and extensible HTTP server pipeline that would be able to run without IIS dependencies. This allows e.g. self-hosting ASP.NET Web API or SignalR applications in Windows Service and other interesting scenarios.

OWIN works with a concept of middlewares. You can register any number of middlewares in the pipeline. Basically, middlewares are just functions with two parameters – request context and next middleware. The middleware can look at the request context and process the HTTP request, or pass the request to another middleware (and optionally do something with the response produced by the next middleware).

This mechanism is very flexible and allows to combine multiple frameworks in one application. The authentication also benefits from this concept and can be totally independent on the application itself.

For example, you can register Web API in the OWIN pipeline. When the request URL matches some API controller, Web API will process the request and produce the response. If Web API doesn’t recognize the URL, it will pass the request to the next middleware in the pipeline, which can be e. g. static files middleware. It will look in the filesystem and return the appropriate file, or again, pass the control to the next middleware in the pipeline. If no middleware wants to process the request, a HTTP error will be produced by OWIN.


OWIN Security is a set of middlewares which handle the authentication. These middlewares are typically registered at the beginning of the pipeline.

When a HTTP request is received, the authentication middleware will make sure the request is authenticated (by looking at cookies, the Authorization header or something like that), set the user identity in the request context and pass the request to the next middleware.

The application will be able to read the information about the user and doesn’t need to know whether the user was logged through an authentication cookie or through Windows Authentication.

If the application notices that the user doesn’t have permissions to perform some operation, it may throw an exception, or set the HTTP status code to 401. The authentication middleware will notice that and can take an appropriate action, for example redirect the user to the login page.

OWIN can be integrated with ASP.NET quite easily thanks to the Microsoft.Owin.Host.SystemWeb package. If you install it in the application, the OWIN pipeline will be added before the ASP.NET stack, so you can use authentication middlewares in combination with Web Forms pages (or MVC controllers). And that’s exactly what I needed in my app recently to be able to use OWIN Security libraries, like Cookies, Facebook, Twitter and so on.


In the demo app, I am using Microsoft.Owin.Security.Cookies package as a replacement of Forms Authentication, because it works in a very similar way – it generates and stores the authentication ticket in a cookie.


1. Install Microsoft.Owin.Host.SystemWeb package in the application.

2. Then, install Microsoft.Owin.Security.Cookies package.

3. Add new OWIN Startup class in the project. This class is used to configure OWIN pipeline.

image


4. Add the following code snippet in the Configuration method in Startup.cs file. It will register the cookie authentication middleware in the OWIN pipeline.

If you need to adjust the default values like the expiration timeout or cookie domain, you can do it right here in the CookieAuthenticationOptions initializer.

app.UseCookieAuthentication(new CookieAuthenticationOptions()
{
    LoginPath = new PathString("/Login.aspx")
});


5. To issue an authentication cookie, call Context.GetOwinContext().Authentication.SignIn instead of FormsAuthentication.SetAuthCookie.

You will need to build a ClaimsIdentity which represents the current user. This identity contains a collection of claims – e.g. username, user ID, list of roles, e-mail and other information about the user. You can add any custom claims in the identity – they will be encrypted and stored in the authentication cookie.

If you are already using ASP.NET Identity, there is a method called CreateIdentity, which will build the ClaimsIdentity for you.

protected void LoginButton_OnClick(object sender, EventArgs e)
{
    if (Membership.ValidateUser(UserName.Text, Password.Text))
    {
        // get user info
        var user = Membership.GetUser(UserName.Text);

        // build a list of claims
        var claims = new List<Claim>();
        claims.Add(new Claim(ClaimTypes.Name, user.UserName));
        claims.Add(new Claim(ClaimTypes.NameIdentifier, user.ProviderUserKey.ToString()));
        if (Roles.Enabled)
        {
            foreach (var role in Roles.GetRolesForUser(user.UserName))
            {
                claims.Add(new Claim(ClaimTypes.Role, role));
            }
        }

        // create the identity
        var identity = new ClaimsIdentity(claims, CookieAuthenticationDefaults.AuthenticationType);

        Context.GetOwinContext().Authentication.SignIn(new AuthenticationProperties()
        {
            IsPersistent = RememberMe.Checked
        }, 
        identity);

        Response.Redirect("~/");
    }
    else
    {
        FailureText.Text = "The credentials are not valid!";
    }
}


To sign out, you need to call SignOut method:

protected void LogoutButton_OnClick(object sender, EventArgs e)
{
    Context.GetOwinContext().Authentication.SignOut();
    Response.Redirect("~/");
}


6. If you are using ASP.NET login controls, you may need to replace them with your own mechanisms as the controls are hard-coded to use the Forms Authentication. Unfortunately, there are no extensibility points to replace static method calls to FormsAuthentication.SetAuthCookie.

This applies to the following controls:


If you are using these controls without specifying your own templates for them, you may use the following quick action to generate their code.

image

You can now get rid of the Login control and use only the code inside the template. Just add OnClick to the button and use the code from step 5 to perform the authentication.


7. The last thing you need to do is to disable Forms authentication in web.config. Change the authentication mode to None. Don’t worry, there is still the OWIN authentication.

<authentication mode="None" />


Note that the URL authorization mechanism (system.web/authorization element) will still work. OWIN still sets the ClaimIdentity in the HttpContext.Current.User property, so the URL authorization module will be able to see whether the user is authenticated and in which roles it is.


You can see the working demo on GitHub in the ModernizingWebFormsSample.Auth.New project.

Long time ago, I have learned that underestimating the architecture of a software project is much worse than over-engineering it. When the project evolves, there are always some new requirements which completely break some of the initial assumptions. Any robustness that can help with addressing larger changes can be very helpful and can save a lot of time and sleepless nights.

Even the tiniest, one-purpose scripts which generates some report can grow and grow, and suddenly it becomes a large system that runs a department of a global corporation. I have seen that so many times, and being lazy at the beginning of the project often means great issues in the future.

But you know, we have a deadline…


Years ago, I tried to design a shared infrastructure for projects we have been doing in my company. Our typical project was a web-based line of business application, with lots of CRUDs, but there were always a lot of custom complex workflows and integrations.

When you look at almost any demo of ASP.NET application with Entity Framework, you can see that they are accessing the DbContext right in the MVC controllers, and the EF entities are used even in the views (where they can do lazy loading and all sort of nasty things).

This approach works great for a simple demo, and it is actually great for the beginners as it doesn’t get too complicated. But it is a nightmare in any large-scale application, as we saw in many apps written by somebody else which we had to maintain later. It leads to a lot of performance issues (lazy loading everywhere), repetitive code snippets (copy pasting, find & replace programming) and inconsistencies caused by the fact you can access any table from any page in the application.


We have always strictly separated “data access layer” which contained Entity Framework stuff, a “busines layer” with a domain model that was mapped from the EF entities, and a “presentation layer” on the top.

The business layer was always the most fascinating one for me – there are always a lot of things inside, and everyone is doing it quite differently.


Repositories and Query Objects

For some people, repositories are anti-pattern. For some people, Entity Framework DbSets are your repositories and there is no need to implement another useless layer on top of them.

However, I have found this layer very useful, so we are used to implement a repository over DbSet (or any other database table or collection), for a dozen of reasons. This extra layer gives us a great flexibility when we need to implement features like soft delete or entity versioning, and helps greatly in integration tests as it allows nice mocking.

Unlike a lot of people, we don’t have the all-purpose GetAll() method that would return IQueryable in the repos. Our repositories can only Insert, Update, Delete and GetById. There are no methods which would return multiple records (other than returning a few entities by ID).

To query for multiple records, we use Query Objects. They are great to encapsulate complex queries and ensure that the queries are not repeated across the entire application.

If you allow to access IQueryable, you will soon have expressions like productsRepo.GetAll().Where(p => p.CategoryId == category) spawned everywhere in the project. If you want to add soft delete checks later, it is very difficult to find all usages of this table.

Thanks to extracting this logic in a query object, we can have a class named ProductsByCategoryQuery in the project, which can be used on all places in the application. If we hit into any performance problems with Entity Framework (which happens in case of complex queries), we can re-implement the query object to use raw SQL while keeping the rest of the application unchanged, and so on.

Also, the query objects give us an unified way to do sorting and paging, which helps with building generic CRUD mechanisms.


Facades and Services

The business logic of the application is implemented in facades and service classes. I use the term “facade” for classes which are used directly from the presentation layer – facades expose all functions the UI needs.
All other classes with some business logic are referred as services, and they can be grouped in quite a complex hierarchies, depend on each other etc.

These facades and services use repos and queries for implementing everything the business layer does.


Model

In our case, the domain model of the application is typically a bunch of DTO (data transfer objects). Unlike most of the books says, I like the anemic model approach much more. I find very impractical to inject dependencies into domain objects.

Because most of the domain model objects are very similar to EF entities, we have adopted AutoMapper. It is a really great tool and I like its ProjectTo() method that can translate the mappings to IQueryable.

There are some caveats however. You should avoid nesting DTOs to prevent the queries to be super-complicated. We have also found out that it is a very good idea to have multiple DTOs for every entity. We have list DTOs which are used in grids and lists, we have detail DTOs for the edit forms, we have basic DTOs for filling the comboboxes and lot more. Thanks to AutoMapper, most of our mappings are just CreateMap<TEntity, TDTO>() with no additional configuration.


…and it’s Open Source

I have been showing the way how a business layer can be designed in many of my conference and user group talks. Our Riganti Utils Infrastructure library is developed on GitHub and anyone is welcome to use it, or to take inspiration from it.

The current version of the infrastructure is 2 and currently, we are in process of designing its third version.


In the next part of this article, I will try to address the issues with v2 and how to make the infrastructure easier to use.