In the previous post, I described how to use Windows Packaging Project in Visual Studio to build a MSIX package manually.

I also mentioned the difference between running the application normally (when your WPF/WinForms app project is marked as a startup project) and running the application from a package (when the package project is the startup project).

For normal development, you’d ll be probably running the application normally, but it is useful to have the opportunity to test the package directly from the Visual Studio – there may be tiny differences between these two modes.


Continuous everything

Once your application is ready, you’ll want to distribute it to the end users. Commonly there is also a small group of “beta testers” or “early adpoters” who’ll want to get preview releases. You may also want to have internal builds.

Therefore, we can create several release channels:

  • Dev (not automated, built directly from Visual Studio)
  • Preview (built and published automatically for each commit in master)
  • Release (built automatically, published manually)

Since the Dev version will not go through the CI/CD process, let’s update the Package manifest to be the manifest for the Dev version.

  1. Set the Package Identity to “yourappuniquename-dev”.
  2. Add a “[DEV]” suffix to the Display Name so you can easily recognize the installed versions.

When you set the Package project as a startup project and run it, the application should install automatically in the Start menu.


Automated builds of MSIX packages

I am using Azure DevOps which is a natural choice for most .NET developers. However, if you prefer any other CI/CD solution, don’t worry – everything we’ll do can be automated using command line tools, and Azure DevOps only provides UI for these operations.

Creating the new Build pipeline

I have created a new Build pipeline using the new YAML pipelines. They don’t have such comfortable UI as the classic pipelines, but they store the entire pipeline together with the source code and can be versioned with full utilization of branches, which is super-important in larger projects because the structure of the solution evolves over time, there are always some new components and so on.

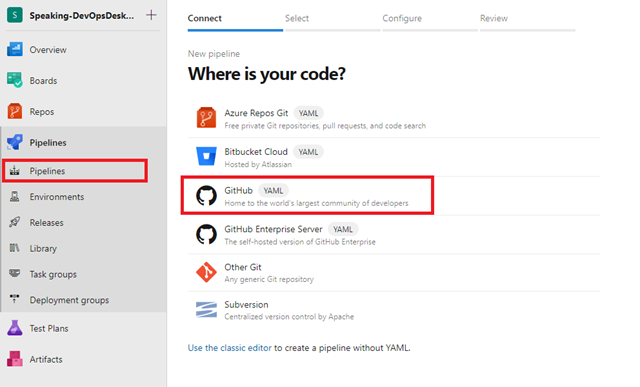
If you store your source codes within Azure Repos, it is the easiest way. If your repo is elsewhere (External Git, SVN), choose the appropriate option.

My sample project is on GitHub, so I am choosing it.

Creating the new pipeline

On the next step, I’ve selected the repository and authenticated with my GitHub account.

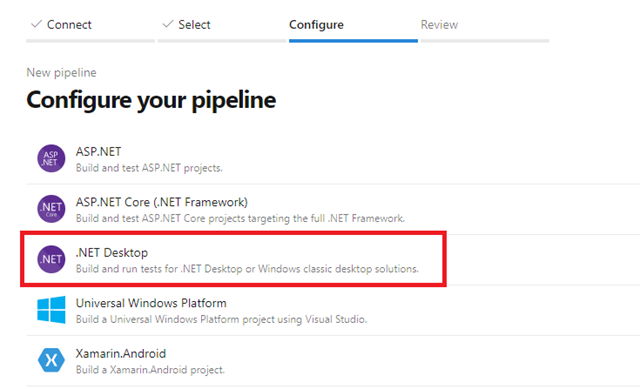
Now select .NET Desktop even if your app is in .NET Core – we’ll remove most of the code anyway:

Choosing starter template

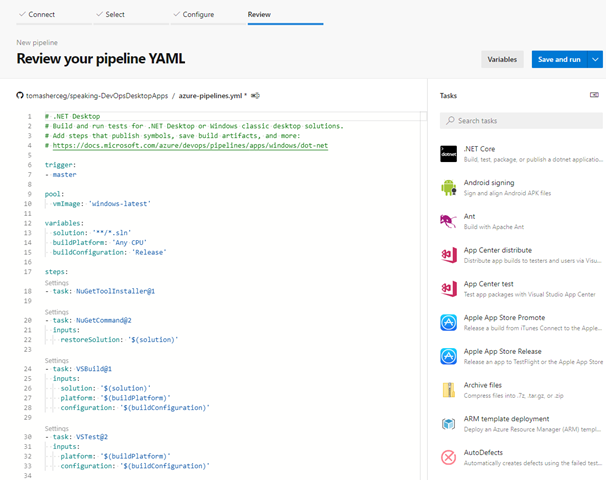
Azure DevOps now opens the YAML editor you can use to define your build process.

YAML editor


Buidling the packages

Our process consists of 3 steps:

  • Udpdating the package manifest to match the correct channel. Since the manifest is a XML file, we can do this using PowerShell.
  • Building the solution (with some MSBuild parameters added so the package is produced)
  • Publishing the MSIX and related files as build artifacts

Since we want to have the Preview and Production consistent, we’ll build both within the same build from the same sommit. Thanks to this, when you make sure that the Preview version is working, you can publish the same source code as a stable version.

The YAML file starts with the following code:

trigger:
- master

pool:
  vmImage: 'windows-latest'

variables:
  solution: '**/*.sln'
  buildPlatform: 'x86'
  buildConfiguration: 'Release'
  msixInstallUrl: https://wugdaysdemoapp.azurewebsites.net
  packageVersion: 1.0.0
  packageName: 'WUG Days Demo App'

jobs: 
- job: BuildMSIX
  strategy: 
    matrix: 
      Preview:
        channelName: 'preview'
        packageIdSuffix: '-preview'
        packageNameSuffix: ' [PREVIEW]'
      Production:
        channelName: 'production'
        packageIdSuffix: ''
        packageNameSuffix: ''
  • The first section says that this pipeline is triggered on any commit made to the master branch.
  • The second section says that we’ll be using the latest version of the built-in Windows agents. These built-in agents come with Azure DevOps and you’ll probably have some free build minutes. If you’d like to use you own VMs, make sure they have the latest Visual Studio and Windows 10 SDK installed.
  • The third section defines variables for the entire build pipeline.
  • Since we want to repeat the same steps for two channels (Preview and Production), I’ve added the strategy element. It defines additional three variables (channelName, packageIdSuffix and packageNameSuffix) for the two runs (Preview and Production).
  steps:
  - task: PowerShell@2
    inputs:
      targetType: 'inline'
      script: |
        [xml]$manifest= get-content ".\src\WpfCoreDemo.Package\Package.appxmanifest"
        $manifest.Package.Identity.Version = "$(packageVersion).$(Build.BuildId)"
        $manifest.Package.Identity.Name = "demo-864d9095-955f-4d3c-adb0-6574a5acb88b$(packageIdSuffix)"
        $manifest.Package.Properties.DisplayName = "$(packageName)$(packageNameSuffix)"
        $manifest.Package.Applications.Application.VisualElements.DisplayName = "$(packageName)$(packageNameSuffix)"
        $manifest.save(".\src\WpfCoreDemo.Package\Package.appxmanifest")

  - task: VSBuild@1
    inputs:
      solution: '$(solution)'
      msbuildArgs: '/restore /p:AppInstallerUri=$(msixInstallUrl)/$(channelName) /p:AppxPackageDir="$(Build.ArtifactStagingDirectory)/$(channelName)" /p:UapAppxPackageBuildMode=SideLoadOnly /p:GenerateAppInstallerFile=true'
      platform: '$(buildPlatform)'
      configuration: '$(buildConfiguration)'

  - task: PublishBuildArtifacts@1
    inputs:
      PathtoPublish: '$(Build.ArtifactStagingDirectory)'
      ArtifactName: 'drop'
      publishLocation: 'Container'

In the rest of the file, we define the build tasks:

  • The first is a PowerShell script that opens the manifest file as XML and updates the package identity (version, name) and the display name (it’s there twice). The version number is composed from the static packageVersion variable (1.0.0) with added Build.BuildId built-in variable that is a numeric sequence representing the number of builds.
  • The second task is the MSBuild with a few parameters:
    • /restore says that we want to do NuGet restore during the build
    • /p:AppInstallerUri specifies the URL where the MSIX package will be published
    • /p:AppxPackageDir is the path where we want to have the package outputs (the default is projectDir/AppPackages) – I am putting in in the staging directory for the artifacts task
    • /p:UapAppxPackageBuildMode=SideLoadOnly means that the package won’t go the the Windows Store and will be side-loaded
    • /p:GenerateAppInstallerFile tells MSBuild to generate the .appinstaller file – it is a simple file that defines the latest version of the package and can be used to check whether theare are new versions of the app
  • The third task just takes the artifacts staging directory and publishes it as a result of the build.

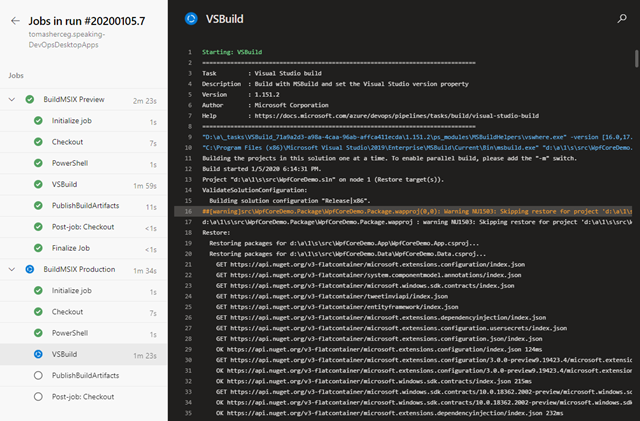
Build progress

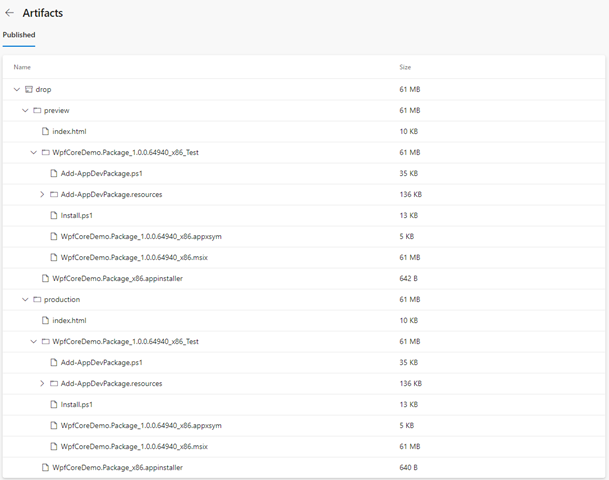
When the build finishes, your packages will be published in the drop artifact:

Published build artifacts

You can see that there are two folders in the artifact, and each holds the index.html page, the app installer file and a versioned folder with the MSIX package itself.

image


That’s for building the packages. In the next post, I’ll show how to release the packages.

For a few last years, my company was building mostly web applications. The demand for desktop applications was very low, and even though we had some use cases in which building a desktop app would be less costly, our customers preferred the web solutions. The uncertain future of WPF, together with low interest in UWP, indicated that the web is practically the only way to go.

The situation changed a bit when Microsoft announced that .NET Core 3.0 would support WPF and WinForms. At about the same time, we got a customer who wanted us to build a large custom point-of-sale solution, and from all the choices we had, WPF sounded like the most viable option. There were many desktop-specific requirements in the project, for example printing different kinds of documents (invoices, sales receipts) using different printers, an integration with credit card terminals, and more.


Deployment of desktop apps

Together with WPF and WinForms on .NET Core, Microsoft also started pushing a new technology of deployment desktop apps: MSIX.

It is conceptually similar to ClickOnce (simple one-click installation process, automatic updates, and more), but it is very flexible. The most severe pain we had with ClickOnce was when we used it for large and complicated apps. We were hitting many issues and obstacles during the installation and upgrade process of the apps. The users were forced to uninstall the app and re-install it again. Sometimes, they had to delete some folder on the disk or clean something in the registry to make ClickOnce install the app.

MSIX should be more reliable as it was designed with respect to a wide range of Windows applications. It is a universal application packaging format that can be used for classic Win32 apps as well as for .NET and the new UWP applications.

It is also secure as the app installed from a package runs in a container - it cannot change system configuration, and all writes in the system folders or registry are virtualized. When you uninstall the app, no garbage should remain in your system.

You can choose to distribute the app packages manually, or you can use Windows Store for that. The nice thing is that you can avoid Windows Store entirely and use any way you want to distribute the MSIX. The most natural way is to publish the package on a network share or on some internal web server so they can be accessed using HTTPS.

Every step in the package building process can be automated using command-line tools, which allows us to embrace DevOps practices we got used to from the web world.


Our WPF project started when .NET Core 3.0 was in an early preview, but we have decided to try both WPF on .NET Core and the new MSIX deployment model.


The Simplest Scenario: Building a package to the WPF app

In my sample project, I have a simple WPF app that uses .NET Core 3.0.

The first step is to add a Windows Application Packaging Project in the solution:
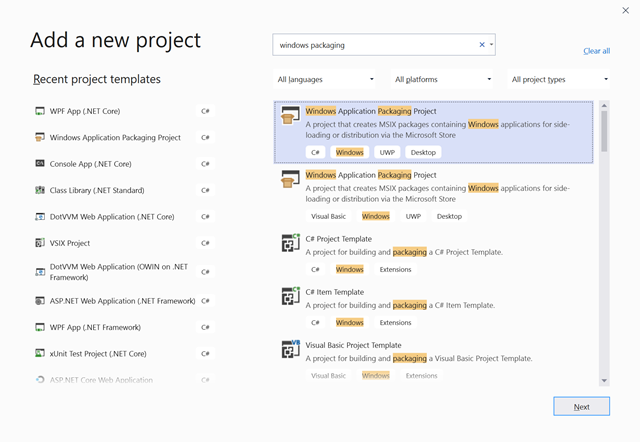
Adding a Windows Application Packaging Project


The Windows Package project contains a manifest file. It is an XML file, but when you open it in Visual Studio, there is an editor for it.
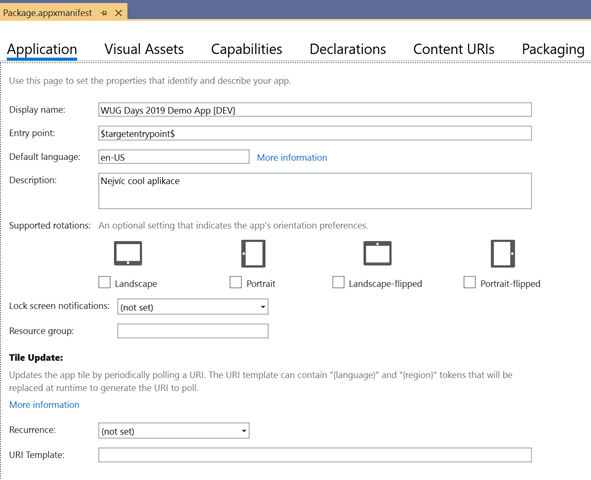
Application Manifest editor


The most important fields are Display Name on the first tab, and Package Name and Version on the Packaging tab.

There are also several image files with the app icon, Windows Store icon, splash screen image, and so on.

Don't forget to make sure the WPF app is referenced in the Applications folder of the Windows Package project.

Application referenced in the Packaging project


Now, when you set the WPF project as a startup project and run it, the application will run in a classic, non-package mode. It's the same as it always worked in Windows. The app can do anything that your user has permissions.

However, when you set the Package project as a startup project and run it, the application will run from the package.

There is a NuGet package called Microsoft.Windows.SDK.Contracts that contains the Package class - you can use Package.Current to access the information about the application package - the name, version, identity, and so on. There is even an API to check or download the updates of the package.

public static PackageInfo GetPackageInfo()
{
    try
    {
        return new PackageInfo()
        {
            IsPackaged = true,
            Version = Package.Current.Id.Version.Major + "." + Package.Current.Id.Version.Minor + "." + Package.Current.Id.Version.Build + "." + Package.Current.Id.Version.Revision,
            Name = Package.Current.DisplayName,
            AppInstallerUri = Package.Current.GetAppInstallerInfo()?.Uri.ToString()
        };
    }
    catch (InvalidOperationException)
    {
        // the app is not running from the package, return and empty info
        return new PackageInfo();
    }
}


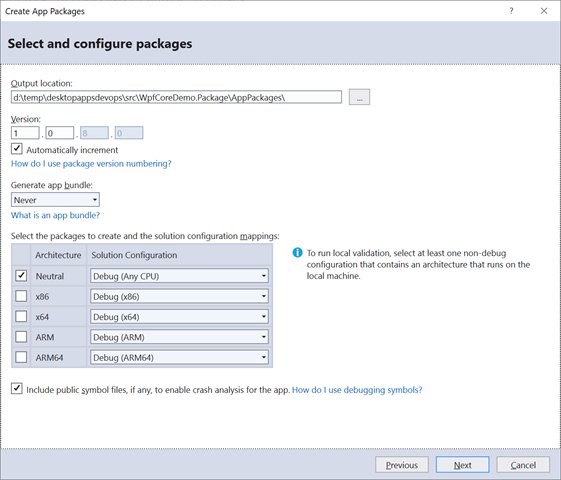
When you right-click the Package project and choose Publish > Create App Packages, there is a wizard that helps you with building the MSIX package.
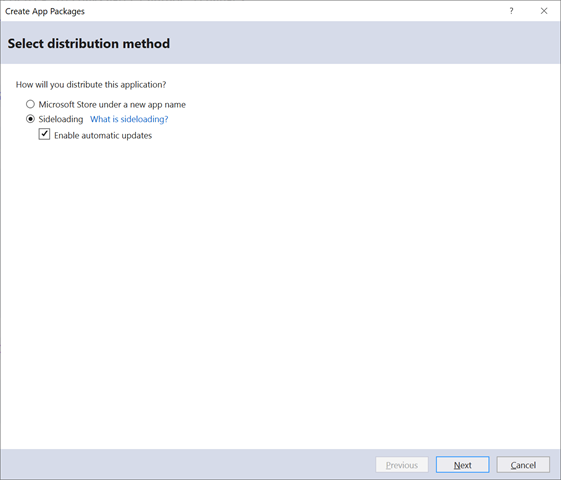
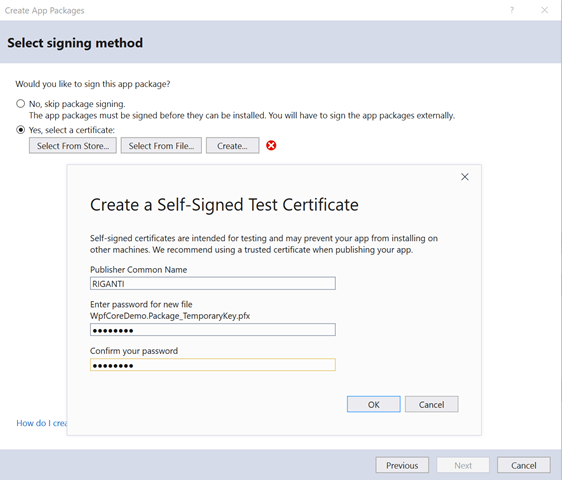
Create App Packages


image


image


Update the installer location to either a UNC path, or to a web URL.
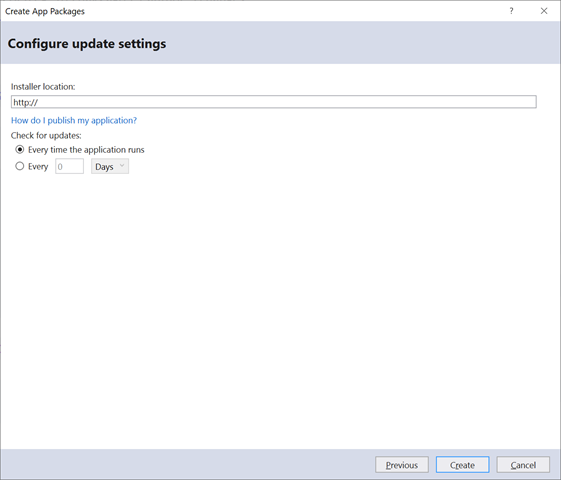
image


The process also creates a simple web page with information about the app and a button to install it. Aside from the MSIX package, there is also an App Installer file holding information about the app, its latest version, and a path to its MSIX package.

You can copy these files on a network share, or publish them at the URL you specified in the wizard.
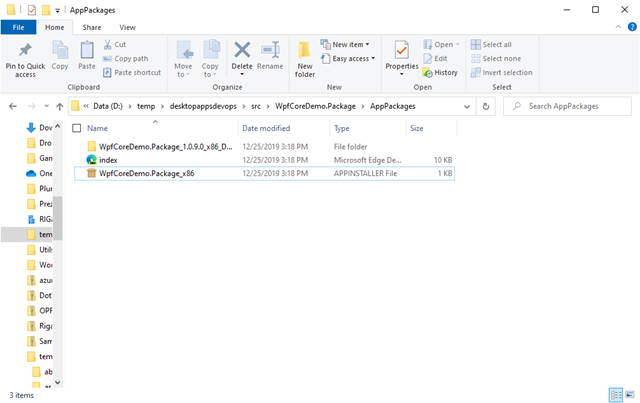
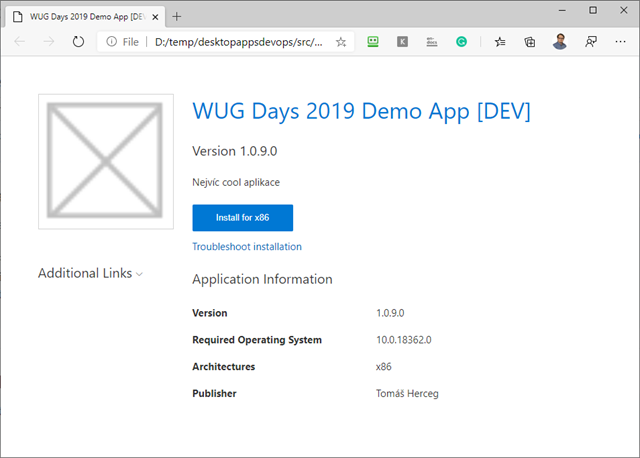
Package with web page and app installer file


Installation page


When you change something in the project, you can publish the package again and upload the files on a web server or to the UNC share.

The application will check for the updates when it is started, and when you launch it next time, the update will install automatically.


Summary

I've just got through the most straightforward scenario for MSIX. In larger projects, you will need to have multiple release channels (preview and stable), you will need to sign your packages with a trusted certificate, and you will want to build the packages automatically in the DevOps pipeline.

I'll focus on all these topics in the next parts of this series. Stay tuned.
Few weeks ago, I got an idea to implement an interesting feature in DotVVM – the Server-side viewmodel caching. It can have a huge impact on a performance of DotVVM applications as it can reduce the data transferred on postback to almost nothing.

Intro – the basic principles of DotVVM

The idea behind DotVVM was quite simple – we want to use MVVM for building web applications, and we want to write in C#.

That’s why the viewmodel in DotVVM is a C# class and lives on the server where .NET runtime is. In order to have client-side interactivity in the web page, the viewmodel needs to operate on the client-side. Therefore, DotVVM serializes the viewmodel into JSON and includes it with the page HTML.

When the page is loaded, the client-side library of DotVVM will parse the JSON and create a Knockout JS instance of the viewmodel. Thanks to this, the DotVVM controls can use the Knockout data-bind attributes to offer their functionality. DotVVM just translates <dot:TextBox> to <input data-bind=”…” /> to make it working.

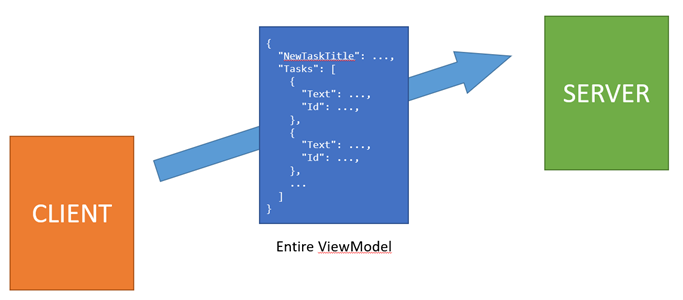
When the user decides to click a button, there is a method that needs to be called. However, this method lies on the server. DotVVM has to take the Knockout JS viewodel, serialize it and send it to the server, where it is deserialized so the method has the all the data and state that it needs to run. After the method completes, the viewmodel is serialized again and sent to the client where it is applied to the Knockout JS instance of the viewmodel and all controls in the page are updated.

An entire viewmodel is sent to the server

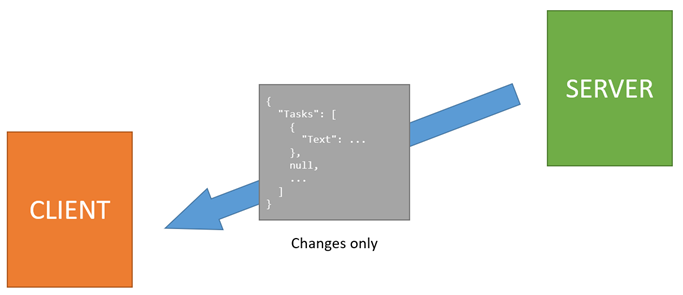
Changes made on the server are sent to the client

The entire process involves transferring the viewmodel from the server to the client and back. The response to the postback is efficient in general as it doesn’t need to transfer the entire viewmodel. The server compares the current viewmodel with the version received from the client, and sends only the changes.

But because of the stateless nature of DotVVM, the client has to send the entire viewmodel to the server. Or had, to be precise, because this now changes with the Server-side viewmodel caching.

DotVVM offers several mechanisms to prevent the entire viewmodel to be transferred:

  • The Bind attribute can specify the direction in which the data will be transferred.
  • The Static Commands allow to call a method, pass it any arguments and update the viewmodel with the result returned from the call.
  • REST API bindings can load additional data from a REST API which are not considered as a part of the viewmodel and therefore are not transferred on postbacks.

However, each method has some limitations and is more difficult to use. The comfort of using Command Binding which triggers a full postback is very tempting.

What about storing the viewmodel on the server?

The reason for sending the entire viewmodel on the server is simple – the viewmodel is not stored anywhere. When the server completes the HTTP request and sends the viewmodel to the client, it forgets about it immediately.

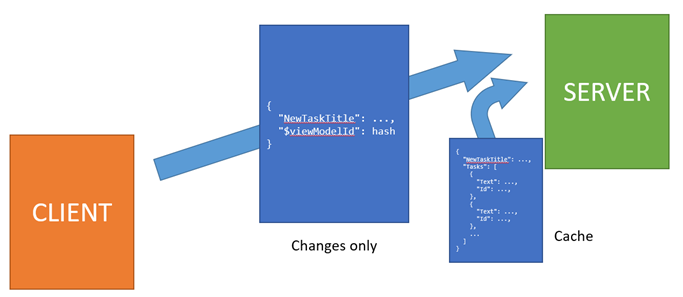
The server-side caching feature will change this behavior – the viewmodel will be kept on the server (in a JSON-serialized form, so the live object with dependencies to various application services could be garbage-collected) and the client will send only the diff on postback.

Only the changes are sent to the server, the rest is retrieved from viewmodel cache

Storing the viewmodel on the server introduces several challenges:

  • It will require more server resources. The viewmodels are not large in general (the average size is 1-15 kB based on the complexness of the page) and they can be compressed thanks to their text-based nature.
  • It can make DOS attacks easier it an attacker finds a way to exhaust server resources.
  • When the application is hosted on a web farm, the cache must be distributed.
  • What about cache synchronization in case of multiple postbacks?
  • Is the cache worth the troubles at all?

During our use of DotVVM on customer projects, we have made several observations:

  • When DotVVM is used on a public-facing websites, the viewmodels are tiny and mostly static. It is very frequent that all HTTP GET requests have the same viewmodel and it changes only then the user interacts with the page (e.g. enters a value in a textbox).
  • When DotVVM is used in line of business applications with many GridView controls, the most of the viewmodel is occupied by the contents of the GridView. If the user doesn’t use the inline edit functionality, the GridView is read-only and there is not much value in transferring its contents back to the server – the server can retrieve the most current data from the database.

It is obvious that the server-side caching will not help much in the first case, however it will help a lot in the second case.

Imagine a page with a GridView control with many rows. Each row will contain a button that can delete the particular row.

The viewmodel will contain a collection of objects representing each row. The data are read-only and thus cannot change. When the delete button is clicked, the viewmodel doesn’t need to be transferred to the server at all – we have saved almost 100%.

There is still some metadata that need to be transferred, like the cached viewmodel ID, CSRF token, and also the encrypted and protected values are excluded from the caching mechanism. But this data are relatively small in comparison to the GridView data.

Even if the user decides to use the inline editing functionality and updates a particular row, only the changes made in the viewmodel will be transferred. If there was 50 rows and one was changed, we can save about 98% of the data.

The viewmodels have 1 to 15kBs in average, so it’s not such a big deal, but still, when you multiply it by the number of concurrent users, or consider the users using a cellular networks, the difference can be quite significant.

Deduplication of cache entries

The observation for public-facing websites mentioned in the previous section brings another challenge – imagine there are thousands of users visiting the website. Most of them will leave immediately without making any postback, or they will just browse a few pages without any other of interaction that would trigger the postback.

As was mentioned before, the viewmodels in this case can be static. They will contain a few values that are used by the page, but their values will be the same when the page is loaded.

Imagine a page with a contact form. The viewmodel will contain properties for the subject, message contents and reply e-mail address, but they will be empty unless the user change them.

That’s why we’ve decided to use a hash of the viewmodel as the cache key. These pages will not exhaust the cache with thousands of equal entries because they will get the same key. This will allow to have just one cache entry for each page that will be shared between all its users (unless they change something and make a postback).

The encrypted and protected values are excluded from the caching mechanism, so it should not bring any security issue. When the user changes the viewmodel, it will get a different hash and will be stored in a separate cache entry.

Can the cache entry expire?

Of course it can. Most of us have probably had issues with expired sessions. But thankfully, this will not be the case of DotVVM. We always have the most current viewmodel on the client, so when the postback is sent and the server cannot find the viewmodel in cache, it will respond that there is a cache miss. In this case, DotVVM will automatically make an additional (full) postback sending the entire viewmodel to the server. Unless the authentication cookie is still valid, the postback will be performed – it will be just a little slower than usual.

The problem is now reduced in fine-tuning the cache settings – choosing a good compromise between the lifetime of the cached viewmodels and the cache size (and a proper storage – it may not be efficient to store the data in-memory).

It will take a lot of measurements and probably creating some tools which can help with making informed decisions on how to set up the cache correctly.

Can I try it now?

Not yet, but very soon. I have just added a new API for turning on experimental features. But in the next preview release of DotVVM, there will be an option to turn this feature on globally, or only for a specific pages.

Recently, I have written a series of articles on modernizing ASP.NET Web Forms apps. Now this topic became even more important thanks to the recent announcement of .NET 5. It was made clear that ASP.NET Web Forms will not be ported to .NET Core.

TLDR: DotVVM can run side by side with ASP.NET Web Forms, and it also supports .NET core. You can install it in your Web Forms project and start rewriting individual pages from Web Forms to DotVVM (similar syntax and controls with MVVM approach) while still being able to add new features or deploy the app to the server. After all the Web Forms code is gone, you can just switch the project to .NET Core. See the sample repo.

To rewrite or continuously upgrade

There are still plenty of ASP.NET Web Forms applications out in the world and their authors now stand by a difficult decision:

  • Throwing the old application away and rewrite it from scratch using modern stack
  • Trying to continously modernize the app and rewrite all the pages on-the-fly

The first option – total rewrite – is very time consuming. If the original application was developed for more 10 years, which is not uncommon, I can hardly imagine that it can be rewritten it in less than half of that time. In addition, when the application needs to support company daily tasks and workflows while responding to rapidly changing business needs, it is impossible to stop adding new features for months or even years because of the rewrite.

Of course, the company can build a new team that will develop the new version while keeping the old team maintaining and extending the old app, but it means double effort and a vast amount of time required to transfer the domain knowledge from the old team to the new one. Also, many things will need to be done twice, and it will probably take years until the new version is ready for production.

And finally, the management never likes to hear about rewriting the software from scratch. I have seen many situations where the project leads had to fight very hard in order to justify such decision.

The second option – the continuos modernization – looks a little bit easier. Imagine you have a Web Forms application with hundreds of ASPX pages. If you can rewrite one page per day using other technology and integrate the new pages with the old ones so the user won’t notice they are made with different stacks, after several months you can get rid of all of the ASPX pages and stay with a more modern solution. It may not be perfect as there will still be some legacy code, but it is much better than nothing, and if you are lucky and don’t use WCF or Workflow Foundation which are also not supported on .NET Core, you will be able to move the project to .NET Core.

Two projects? Possible, but maybe more difficult than it has to be.

But how to do it? Let’s suppose we have an old app that needs to be maintained.

Shall we create a new ASP.NET Core project that would run side by side, maybe on the same domain, and make links from the old to new pages and vice versa?

It can work if the same CSS styles are used. The user should not be able to tell that he actually uses two web apps.

However, there may be some issues with sign-on as the new app can use different authentication cookies than the old one – the authentication will need to be integrated somehow. Also, if session is used (which is not a good idea in general, but it is also quite frequent), it will not be shared between the two applications.

Moreover, this will require some configuration changes on the server, and the deployment model will need to be changed as you will now deploy two applications instead of one.

If the application caches some data in memory, you may also run into various concurrency issues as the caches will need to be invalidated. There will also be some duplication if the business layer is not properly separated from the UI.

What is more, if you decide to use Angular, React or other JavaScript framework, there is also a large amount of knowledge required to start working with these technologies. The business logic and data will have to be exposed through a REST API (or Graph QL), which may be an additional effort to set up at the beginning.

DotVVM can make this simpler

What if there is a framework that can be run side by side with ASP.NET Web Forms in one application, but works also with the newest versions of ASP.NET Core?

It would make so many things easier. You will have just one project to deploy. There will be no changes in the deployment model – it will still be an ASP.NET application. You won’t need to take care about sharing the user identity between two apps because there won’t be two apps.

With DotVVM, it is quite easy. It was one of our initial thoughts that lead us to start with the project. If you haven’t heard of it – it is an open source MVVM framework supporting both ASP.NET and ASP.NET Core. It has nice Visual Studio integration and recently joined the .NET Foundation.

How does the migration work?

You can install DotVVM NuGet package in the Web Forms application and it will run side by side with the ASPX pages that are in the project.

From the deployment perspective, there are no changes – it is still the same ASP.NET application that gets deployed to the server as usual.

You can start with copying the Web Forms master page and converting it in the DotVVM syntax. It is different, but not much – most of the controls have the same names, except that you are using the MVVM approach. Use the same CSS so the users won’t notice the change.

Then, you can start rewriting all the pages one by one from Web Forms to DotVVM. DotVVM contains similar controls like GridView, Repeater, FileUpload and more. The most difficult part will be extracting the business logic from the ASPX code behind to the DotVVM viewmodel, but it is still C#.

If your business layer was propely separated, it should be trivial. If not, take this as an opportunity to do the refactoring and get the cleaner code. Thanks to the MVVM approach, your viewmodels will be testable and the overall quality of the application will greatly improve.

DotVVM pages will share the environment with the ASP.NET ones, including the current user identity. You won’t need to expose your business logic through a REST API, you can keep the same code interacting with the database.

At each point of the process, the application works, can be extended with new features, and can be deployed. The team is not locked to the migration and can do other things simultaneously.

After a few months, when all the ASPX pages are rewritten in DotVVM, you will be able to create a new ASP.NET Core project, move all DotVVM pages and viewmodels into it and use them with .NET Core. The syntax of DotVVM is the same on both platforms.

If you have been using Forms Authentication in Web Forms, you will need to switch it to ASP.NET Core Cookies, but that should be an easy-enough change.

Are there any samples?

Yes, I have created a GitHub repo which describes the process in detail. There are five branches, each one displaying one of the steps.

In the first one, there is a simple ASP.NET Web Forms application. In the last one, there is the same app rewritten in DotVVM and running on .NET Core.

We have used this way to migrate several Web Forms applications. If the business layer is separated properly, rewrite on one page takes about 1 hour in average. If the business logic is tighen up with the UI, it can take significantly more time, but it can be a way to improving the application testability and I think it is worth – even poorly written apps can be saved using this way.

What if I need help?

We’ll be happy to help you. You can also contact the DotVVM team on our Gitter chat. Check out the DotVVM documentation and the cheat-sheet of differences between Web Forms and DotVVM.

Recently, I have been doing a few live streams with Michal Altair Valasek, fellow MVP from the Czech Republic. We took his AskMe demo app which shows how to build a non-trivial web app in ASP.NET Core, and made a version built in DotVVM.

These streams were in Czech language, but I got some requests to make live streams in English. So this time, I will be streaming in English, and I will try to fix some issues in DotVVM and bring a few new features in the framework.

The stream will be on my personal Twitch on Thursday 4/4/2019 at 7:30 PM CEST.

Watch TomasHerceg's live video on www.twitch.tv